Clean up the UI
At this point the application successfully loads and displays the remote data, but the resulting view contains fields that shouldn't be displayed (like the task's ID).
Configure the DataGridView
Note: We could do some of the following in the Designer view, but for ease we'll do it in code.
Working again in MainForm.cs, add a private method named CustomizeDataGridView.
private void CustomizeDataGridView()
{
}
Configure the DataGridView to alter the default settings for a DataGridView, for instance when the user selects a row it now selects the whole row rather than a single cell, we disable the user being able to select multiple rows, we make the table read only to prevent the user changing values and we clear the previous columns.
private void CustomizeDataGridView()
{
    this.tasksDataGridView.SelectionMode = DataGridViewSelectionMode.FullRowSelect;
    this.tasksDataGridView.MultiSelect = false;
    this.tasksDataGridView.AutoGenerateColumns = false;

    this.tasksDataGridView.ReadOnly = true;
    this.tasksDataGridView.RowHeadersVisible = false;

    this.tasksDataGridView.Columns.Clear();
}
Next we create variables for each column that we want to display. For each column we set the DataPropertyName to match the SQL column names and a HeaderText property to present a human readable version of the column name. To enusre we aren't wasting space on the UI we are manually controlling the width of the column by setting the Width property.
private void CustomizeDataGridView()
{
    // snipped previous code

    var columnDone = new DataGridViewTextBoxColumn { DataPropertyName = "Done", HeaderText = "Done", Width = 50 };
    var columnDueDate = new DataGridViewTextBoxColumn { DataPropertyName = "DueDate", HeaderText = "Due Date" };
    var columnPriority = new DataGridViewTextBoxColumn { DataPropertyName = "Priority", HeaderText = "Priority", Width = 75 };
    var columnTask = new DataGridViewTextBoxColumn { DataPropertyName = "Task", HeaderText = "Task", Width = 250};
}
Having created the columns we add them to the DataGridView by passing them as an array to AddRange.
private void CustomizeDataGridView()
{
    // snipped previous code

    this.tasksDataGridView.Columns.AddRange(new[] { columnDone, columnDueDate, columnPriority, columnTask });
}
The last step is to call our new method CustomizeDataGridView at the end of loadbutton_Click to configure the DataGridView before we retrieve data.
private void loadButton_Click(object sender, EventArgs e)
{
    // snipped previous code

    this.CustomizeDataGridView();
    // Retreive and display the ToDo List
    this.tasksDataGridView.DataSource = (from x in this._dataModule.DataAdapter.GetTable<Tasks.Tasks>() select x).ToList();
}
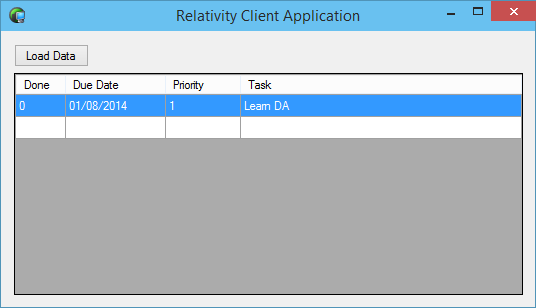
Now when you run the app again and load the data you will be presented with a much improved UI which only shows the user the relevant data.
We could improve the column headers further by, for instance, centering the header text and locking the width of the columns. However this is left as a task for the reader.
In the next two pages we will continue to refine the UI by tweaking the Done column and Priority columns to show something more user friendly.
