Data Abstract and ASP.NET Core
Introduction
This tutorial shows how to build an ASP.NET Core web application that reads and writes its data through a Data Abstract-powered data access layer.
All Data Abstract logic is kept in a separate class library and exposed through a small IDataLayer interface. As a result the web application itself contains no Data Abstract-specific code, which keeps the two layers cleanly separated and independently testable.
Tip: You can follow the steps below to build the project from scratch, or download the finished solution and open it right away: ASP.NET_Core_Sample.zip. The variant with the AutoMapper bonus section is available here.
Data access layer in an ASP.NET Core web application
Web application project
In Visual Studio select Create a new project and choose the ASP.NET Core Web App (Model-View-Controller) template. This tutorial uses the MVC sub-template, but the same approach works for any kind of ASP.NET Core web application, including Web API projects.
Data access library
Add a new .NET Standard or .NET Core class library to the solution and set its name to DataAccess. This library will hold all Data Abstract code. Remember which target framework you pick — it determines which set of assemblies you reference in the next step.
Then add a reference to this DataAccess project from the main web application project.
References and packages
Add references to the following assemblies:
RemObjects.DataAbstract.dllRemObjects.DataAbstract.Server.dllRemObjects.SDK.dllRemObjects.SDK.Server.dll
(RemObjects.DataAbstract.Async.dll is only needed if you use the asynchronous data access APIs and may not be present in every target-framework folder; this tutorial does not require it.)
from the ...\RemObjects Software\Data Abstract for .NET\Bin\.NETStandard or ...\RemObjects Software\Data Abstract for .NET\Bin\.NETCore folder depending on the DataAccess class library platform.
Note: Reference the assemblies directly from the Data Abstract installation. With a default installation they are located under C:\Program Files (x86)\RemObjects Software\Data Abstract for .NET\Bin\.NETStandard (and the two RemObjects.SDK* assemblies under the matching RemObjects SDK for .NET\Bin\.NETStandard folder). Pick the .NETStandard or .NETCore folder that matches your DataAccess class library target framework.
Add NuGet package containing the database driver that will be used:
- Firebird -
FirebirdSql.Data.FirebirdClient - MS SQL -
System.Data.SqlClient - MySql -
MySql.Data - ODBC -
System.Data.Odbc - Oracle -
Oracle.ManagedDataAccess.Core - PostgreSQL -
Npgsql - SQLite -
System.Data.SQLite.Core
Add licenses.licx file to the project (* see below) and set its Build Action to Embedded Resource
Add the following 2 lines to the licenses.licx file:
RemObjects.DataAbstract.Server.ConnectionManager, RemObjects.DataAbstract.Server
RemObjects.DataAbstract.LocalDataAdapter, RemObjects.DataAbstract.Server
Schema and Connections files
Right-click the project in the Solution Explorer, select Add -> New Item . Select Connections File item template located in the Data Abstract folder. Set name of the newly added item to match the project name (f.e. if the project name is DataAccess then the newly added item should have name DataAccess.daConnections ).
Right-click the project in the Solution Explorer, select Add -> New Item . Select Schema File item template located in the Data Abstract folder. Set name of the newly added item to something meaningful (this tutorial assumes that the name of the Schema is set to SampleSchema.daSchema ).
Both newly added project items should have their build action set to Embedded Resource .
Double-click the .daSchema project item. This will start the Schema Modeler app. Define connection, schema tables etc (just like one would do this in any other server app). For purposes of this tutorial set the connection string to SQLite.NET?DateTimeKind=Utc;Data Source=C:\Users\Public\Documents\RemObjects Samples\Database\PCTrade.sqlite.db; and add table Customers to the Schema.
Code (infrastructure)
At this point the steps done closely resemble the steps used to create the Data Abstract server. Now we will define code specific to this project.
Add a new file Startup.cs to the Class Library project and add there this code:
using System.Xml;
using RemObjects.DataAbstract.Server;

namespace DataAccess
{
    public static class Startup
    {
        public static void UseDataAbstract()
        {
            if (RemObjects.DataAbstract.Server.Configuration.Loaded)
            {
                return;
            }

            RemObjects.DataAbstract.Server.Configuration.Load();

            var connectionManager = new ConnectionManager(true);

            using (var resourceStream = typeof(Startup).Assembly.GetManifestResourceStream("DataAccess.DataAccess.daConnections"))
            {
                var resourceXml = new XmlDocument();
                resourceXml.Load(resourceStream);

                connectionManager.LoadFromXml(resourceXml);
            }
        }
    }
}
The ConnectionManager load code looks a bit over-complicated here.
This happened because by default ConnectionManager tries to load itself from the entry assembly, while in this case it needs to load connection definitions from a different Class Library assembly (this API has been simplified in the latest Data Abstract releases). Anyway in a real-world application it might be more feasible to load the connection definitions from a separate configuration file instead of an embedded resource.
Now go to the Startup.cs of the Web App and add line
DataAccess.Startup.UseDataAbstract();
as the last line of the Configure method.
Add a new class named DataService to the DataAccess project and add there the following code:
namespace DataAccess
{
    public class DataService : RemObjects.DataAbstract.Server.DataAbstractService
    {
        public DataService()
            : base()
        {
            this.AcquireConnection = true;
            this.ServiceDataStreamer = new RemObjects.DataAbstract.Bin2DataStreamer();
            this.ServiceSchemaName = "SampleSchema";
        }
    }
}
This is a minimal implementation of a Data Service that will later be used to actually access the database.
Code (data access)
Right-click the SampleSchema.daSchema file and select the Create Table Definition classes item from its context menu. Press Finish to generate the table definition classes.
Note: In this sample the Table Definition classes are sent directly to the web application. In a real-world project it is better to use custom DTO classes together with AutoMapper (or a similar library) to fully separate Data Abstract from the rest of the application — see the bonus section below.
Add a new interface named IDataLayer to the DataAccess project and add there the following code:
using System;
using System.Collections.Generic;
using DataAccess.SampleSchema;

namespace DataAccess
{
    public interface IDataLayer : IDisposable
    {
        IList<Customers> GetAllCustomers();
        void CreateCustomer(Customers customer);
        void UpdateCustomer(Customers customer);
        Customers GetCustomer(string id);
        void DeleteCustomer(string id);
    }
}
Note: Real-world application shouldn’t use Table Definition classes as DTO to prevent abstraction leaks between app layers. For now this tutorial will use Table Definition classes directly. See the bonus section for more details on mapping Table Definition classes and DTO types.
Add a new DataLayer class that will implement the IDataLayer interface:
using System;
using System.Collections.Generic;
using System.Linq;
using DataAccess.SampleSchema;
using RemObjects.DataAbstract.Linq;

namespace DataAccess
{
    public sealed class DataLayer : IDataLayer
    {
        private readonly LinqDataAdapter _adapter;
        private readonly DataService _service;

        public DataLayer()
        {
            this._service = new DataService();
            this._service.Activate(Guid.Empty, false);

            this._adapter = new LinqLocalDataAdapter(this._service);
        }

        public void Dispose()
        {
            if (this._service.IsActive)
            {
                this._service.Deactivate(Guid.Empty);
            }

            GC.SuppressFinalize(this);
        }

        public void CreateCustomer(Customers customer)
        {
            this._adapter.GetTable<Customers>().InsertRow(customer);
            this._adapter.ApplyChanges();
        }

        public void UpdateCustomer(Customers customer)
        {
            this._adapter.GetTable<Customers>().UpdateRow(customer);
            this._adapter.ApplyChanges();
        }

        public void DeleteCustomer(string id)
        {
            this._adapter.GetTable<Customers>().DeleteRow(new Customers() { Id = id });
            this._adapter.ApplyChanges();
        }

        public IList<Customers> GetAllCustomers()
        {
            var query = this._adapter
                .GetTable<Customers>()
                .Select(c => c);

            return query.ToList<Customers>();
        }

        public Customers GetCustomer(string id)
        {
            return this._adapter
                .GetTable<Customers>()
                .Select(c => c)
                .FirstOrDefault(c => c.Id == id);
        }
    }
}
Now register this service in the ConfigureServices method of the Web App’s Startup.cs file:
public void ConfigureServices(IServiceCollection services)
{
    services.AddControllersWithViews();
    services.AddScoped<DataAccess.IDataLayer, DataAccess.DataLayer>();
}
Web Application
Open the Controllers\HomeController.cs file. Add a field and a constructor to the HomeController class as
private readonly ILogger<HomeController> _logger;
private readonly IDataLayer _dataLayer;

public HomeController(IDataLayer dataLayer, ILogger<HomeController> logger)
{
    this._dataLayer = dataLayer;
    this._logger = logger;
}
Now start the application to make sure that everything was configured properly.
Change Index method of the HomeController class to
public IActionResult Index()
{
    var data = this._dataLayer.GetAllCustomers();

    return this.View(data);
}
Then change the Views\Home\Index.cshtml file to
@model IEnumerable<DataAccess.SampleSchema.Customers>

<!DOCTYPE html>

<html>
    <head>
        <meta name="viewport" content="width=device-width" />
        <title>Index</title>
    </head>
    <body>
        <p>
            @Html.ActionLink("Create New", "Create")
        </p>
        <table class="table table-striped">
            <tr>
                <th>
                    @Html.DisplayNameFor(model => model.Name)
                </th>
                <th>
                    @Html.DisplayNameFor(model => model.Phone)
                </th>
                <th>
                    @Html.DisplayNameFor(model => model.Address)
                </th>
                <th>
                    @Html.DisplayNameFor(model => model.Remarks)
                </th>
                <th>
                    @Html.DisplayNameFor(model => model.Discount)
                </th>
                <th></th>
            </tr>

            @foreach (var item in Model)
            {
                <tr>
                    <td>
                        @Html.DisplayFor(modelItem => item.Name)
                    </td>
                    <td>
                        @Html.DisplayFor(modelItem => item.Phone)
                    </td>
                    <td>
                        @Html.DisplayFor(modelItem => item.Address)
                    </td>
                    <td>
                        @Html.DisplayFor(modelItem => item.Remarks)
                    </td>
                    <td>
                        @Html.DisplayFor(modelItem => item.Discount)
                    </td>
                    <td>
                        @Html.ActionLink("Edit", "Edit", new { id = item.Id }) |
                        @Html.ActionLink("Details", "Details", new { id = item.Id }) |
                        @Html.ActionLink("Delete", "Delete", new { id = item.Id })
                    </td>
                </tr>
            }

        </table>
    </body>
</html>
Start the application and enjoy your data:
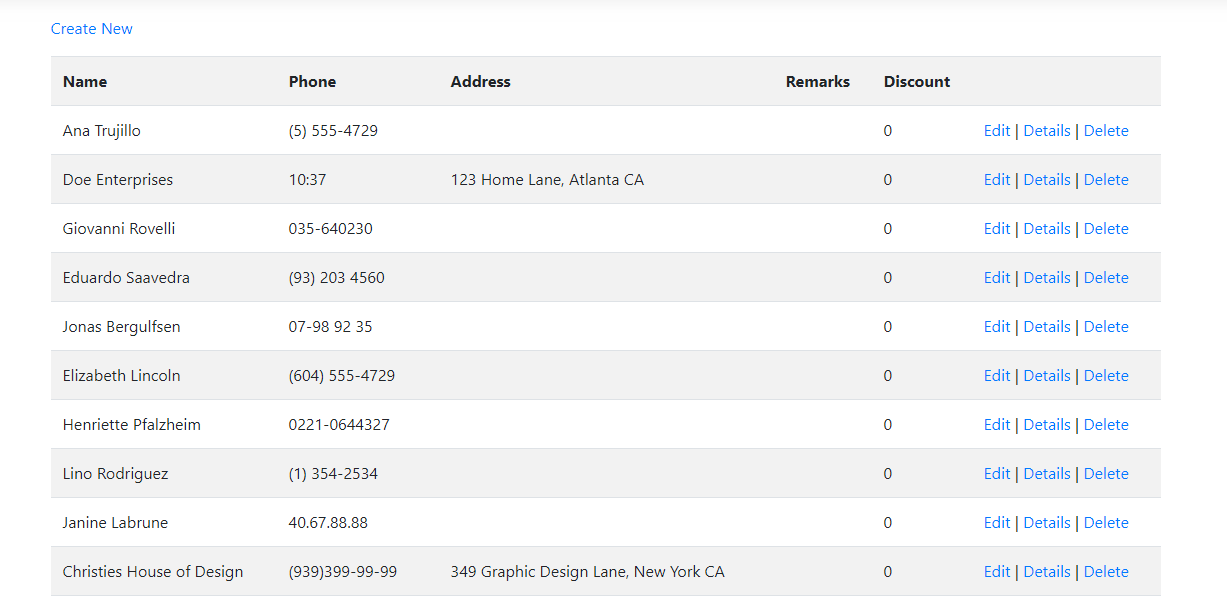
Viewing and editing a customer
The Index view already links each row to Details, Edit and Delete actions. Adding the corresponding pages is straightforward, since the IDataLayer interface already exposes GetCustomer and UpdateCustomer.
Add the following actions to the HomeController:
public IActionResult Details(string id)
{
    var customer = this._dataLayer.GetCustomer(id);

    return this.View(customer);
}

public IActionResult Edit(string id)
{
    var customer = this._dataLayer.GetCustomer(id);

    return this.View(customer);
}

[HttpPost]
[ValidateAntiForgeryToken]
public IActionResult Edit(DataAccess.SampleSchema.Customers customer)
{
    this._dataLayer.UpdateCustomer(customer);

    return this.RedirectToAction("Index");
}
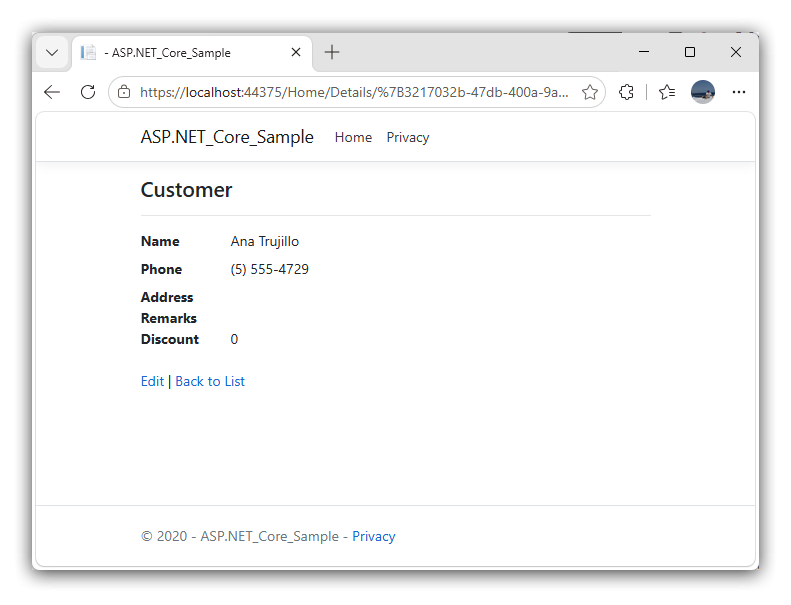
Then add a Details view (Views\Home\Details.cshtml) that shows a single customer. Clicking Details on any row opens it:
Finally add an Edit view (Views\Home\Edit.cshtml) with a simple form bound to the same Customers model. Clicking Edit opens the form, and saving posts the changes back through UpdateCustomer:
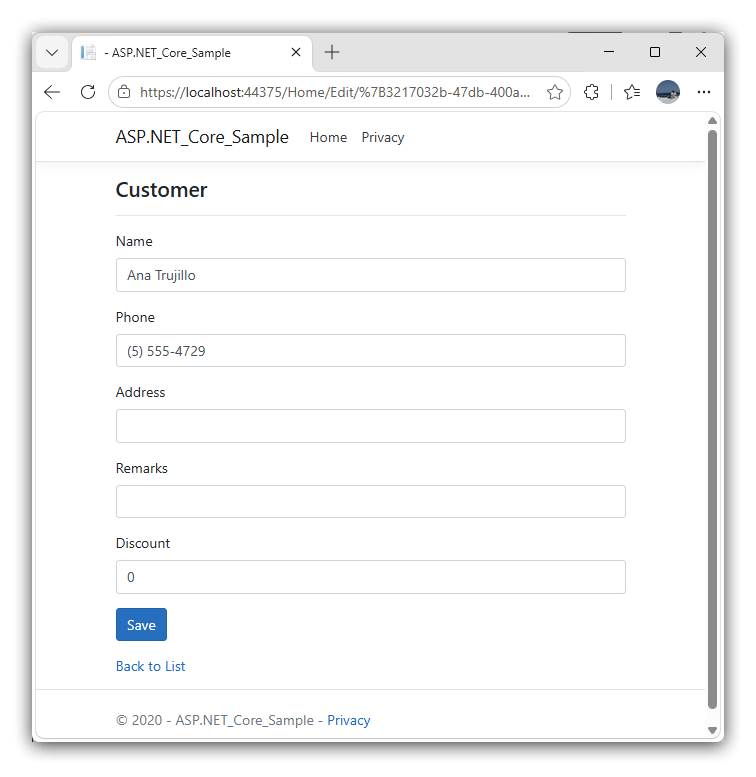
Both views are included in the downloadable solution, so you can use them as a starting point.
The finished project can be downloaded here
(Bonus) AutoMapper Setup
Real-world application should not use Table Definition classes as DTO (data transfer objects) to prevent abstraction leaks between application layers.
In this bonus section we will discuss how to setup AutoMapper to perform transitions between Table Definition classes and clear DTO classes. Please do not consider this section as an AutoMapper tutorial as this is a very brief introduction that cannot cover all features of this library.
At first add the AutoMapper.Extensions.Microsoft.DependencyInjection package reference to the Web Application project. Also add AutoMapper package reference to the DataAccess project.
Then add the AutoMapper configuration call into the Web Application startup code:
public void Configure(IApplicationBuilder app, IWebHostEnvironment env)
{
    ...
    DataAccess.Startup.UseDataAbstract();
    DataAccess.Startup.ConfigureMappings();
}
Then add a new CustomerDTO class to the project:
namespace DataAccess
{
    public class CustomerDTO
    {
        public string Id { get; set; }
        public string Name { get; set; }
        public string Phone { get; set; }
        public string Address { get; set; }
        public string Remarks { get; set; }
        public double Discount { get; set; }
    }
}
This is a simple POCO class that will be used as a DTO class.
The next step is to configure mappings between Table Definition class DataAccess.SampleSchema.Customers and DTO class DataAccess.CustomerDTO .
Add a new DataAbstractProfile class to the DataAccess project and add there this code:
namespace DataAccess
{
    public class DataAbstractProfile : AutoMapper.Profile
    {
        public DataAbstractProfile()
        {
            this.CreateMap<CustomerDTO, DataAccess.SampleSchema.Customers>();
            this.CreateMap<DataAccess.SampleSchema.Customers, CustomerDTO>();
        }
    }
}
Change the IDataLayer interface definition to use the DTO class instead of the Table Definition class:
using System;
using System.Collections.Generic;

namespace DataAccess
{
    public interface IDataLayer : IDisposable
    {
        IList<CustomerDTO> GetAllCustomers();
        void CreateCustomer(CustomerDTO customerDto);
        void UpdateCustomer(CustomerDTO customerDto);
        CustomerDTO GetCustomer(string id);
        void DeleteCustomer(string id);
    }
}
The IDataLayer class implementation now should utilize AutoMapper to perform conversions between DTO and TableDefinition classes:
using AutoMapper;
using System;
using System.Collections.Generic;
using System.Linq;
using DataAccess.SampleSchema;
using RemObjects.DataAbstract.Linq;

namespace DataAccess
{
    public sealed class DataLayer : IDataLayer
    {
        private readonly IMapper _mapper;
        private readonly LinqDataAdapter _adapter;
        private readonly DataService _service;

        public DataLayer(IMapper mapper)
        {
            this._mapper = mapper;

            this._service = new DataService();
            this._service.Activate(Guid.Empty, false);

            this._adapter = new LinqLocalDataAdapter(this._service);
        }

        public void Dispose()
        {
            if (this._service.IsActive)
            {
                this._service.Deactivate(Guid.Empty);
            }

            GC.SuppressFinalize(this);
        }

        public void CreateCustomer(CustomerDTO customerDto)
        {
            var customer = this._mapper.Map<Customers>(customerDto);
            this._adapter.GetTable<Customers>().InsertRow(customer);
            this._adapter.ApplyChanges();
        }

        public void UpdateCustomer(CustomerDTO customerDto)
        {
            var customer = this._mapper.Map<Customers>(customerDto);

            this._adapter.GetTable<Customers>().UpdateRow(customer);
            this._adapter.ApplyChanges();
        }

        public void DeleteCustomer(string id)
        {
            this._adapter.GetTable<Customers>().DeleteRow(new Customers() { Id = id });
            this._adapter.ApplyChanges();
        }

        public IList<CustomerDTO> GetAllCustomers()
        {
            var query = this._adapter
                .GetTable<Customers>()
                .Select(c => c);

            var data = query.ToList<Customers>();

            return this._mapper.Map<IList<CustomerDTO>>(data);
        }

        public CustomerDTO GetCustomer(string id)
        {
            var customer = this._adapter.GetTable<Customers>()
                .Select(c => c)
                .FirstOrDefault(c => c.Id == id);

            if (customer == null)
            {
                return null;
            }

            var customerDto = this._mapper.Map<CustomerDTO>(customer);

            return customerDto;
        }
    }
}
And the last but not the least conversion step is to update the Views\Home\Index.cshtml file to reference the DTO class. To perform this transition change the first line of this file from
@model IEnumerable<DataAccess.SampleSchema.Customers>
to
@model IEnumerable<DataAccess.CustomerDTO>
After this step the DataAccess library does not expose any Data Abstract specific classes to its host Web Application. This clear separation makes it way easier to independently develop and test both the host Web Application and the data access library.
The finished project can be downloaded here