Data Abstract and ASP.NET MVC (Obsolete)
Introduction
This tutorial demonstrates how to access a Data Abstract-powered data provider from an ASP.NET MVC website.
The ASP.NET MVC website created in this tutorial will show a list of customers from the sample PC Trade database, and it will retrieve data via a 2-tier Data Abstract-powered class library hidden behind a data provider interface.
Note: This tutorial is a bit obsolete now. An updated tutorial covering ASP.NET Core can be found here: Data Abstract and ASP.NET Core
Data Source
Data Abstract Class Library
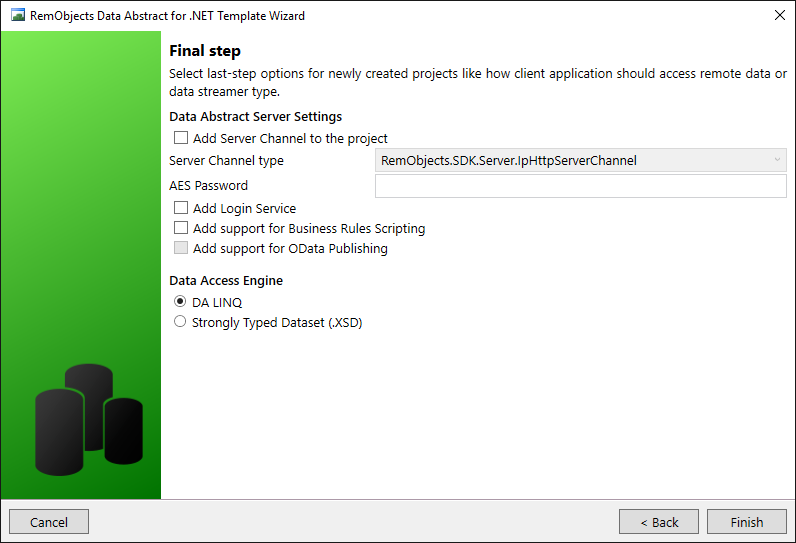
The first step is to create a data provider assembly. Create a new RemObjects Data Abstract Class Library project and name it, for example, MvcSample.Backend.
As you step through the template wizard specify that you want a Two-Tier (Client/Server) Application and that it uses the predefined PCTrade-SQLite default connection as the datasource. Next leave the selection of the tables in their default state. Lastly be sure to uncheck the 'Add Server Channel to the project', 'Add Login Service' and 'Add support for Business Rules Scripting' options.
For simplicity reasons DA LINQ Table Definitions classes will be used as Model classes.
Note: In the real world application, it would be better to use TableDefinition classes only as DTO objects and to provide application-specific model classes.
Rename the TableDefinitions_MvcSample.BackendDataset.cs file to MvcSample.Model.cs and then open it and change the namespace from MvcSample.Backend.MvcSample.BackendDataset to MvcSample.Backend.Model as well.
Note: All classes defined in this file are partial, so new properties and methods can easily be added when needed.
Before finishing with MvcSample.Model.cs rename all instances of the Customers class to Customer. Be careful if you are doing search & replace or using a refactoring tool as they will likely also rename the table name in this line [RemObjects.DataAbstract.Linq.TableName("Customers")] - that must remain Customers.
Note: These changes will be lost once the TableDefinitions file is regenerated, so in most cases, it is much better and easier to rename the corresponding Schema Table instead.
At this point, the MvcSample.Backend assembly can be used as a data source for the ASP.NET MVC application, although it is recommended to hide all Data Abstract-specific implementation details behind interfaces and static methods.
Data Access Engine startup
Add a static Repository class with a single (for now) method:
namespace MvcSample.Backend.DataLayer
{
    public static class Repository
    {
        private static Engine _engine;

        public static void Initialize()
        {
            if (Repository._engine == null)
                Repository._engine = new Engine();
        }
    }
}
This method will be called later from the Application_Start method of the Global.asax.cs file that is part of the ASP.NET MVC project.
Data Access Interface
The next step is to introduce and implement a data access interface.
While this approach looks over-complicated for the scope of this tutorial, it will later allow us to create a more testable application. For example, it allows to mock the data access interface in unit tests and test application logic against data loaded from memory instead of the database. Another advantage of hiding all data access behind an interface is that the actual ASP.NET MVC application will be fully separated from the data access layer (as it should be).
Add a new interface definition file named IDataLayer.cs and define it as
using System;
using System.Collections.Generic;
using MvcSample.Backend.Model;

namespace MvcSample.Backend.DataLayer
{
    public interface IDataLayer
    {
        IList<Customer> GetAllCustomers();

        void CreateCustomer(Customer customer);
        void UpdateCustomer(Customer customer);
        Customer GetCustomer(String id);
        void DeleteCustomer(String id);
    }
}
Then add a private class named DataLayer:
using System;
using System.Collections.Generic;
using System.Linq;
using RemObjects.DataAbstract.Linq;
using MvcSample.Backend.Model;

namespace MvcSample.Backend.DataLayer
{
    sealed class DataLayer : IDataLayer
    {
        private readonly LinqDataAdapter _adapter;

        public DataLayer(LinqDataAdapter adapter)
        {
            this._adapter = adapter;
        }

        public IList<Customer> GetAllCustomers()
        {
            var query = from c
                        in this._adapter.GetTable<Customer>()
                        select c;

            return query.ToList<Customer>();
        }

        public void CreateCustomer(Customer customer)
        {
            this._adapter.GetTable<Customer>().InsertRow(customer);
            this._adapter.ApplyChanges();
        }

        public Customer GetCustomer(String id)
        {
            return (from c
                    in this._adapter.GetTable<Customer>()
                    where c.Id == id
                    select c).FirstOrDefault();
        }

        public void UpdateCustomer(Customer customer)
        {
            this._adapter.GetTable<Customer>().UpdateRow(customer);
            this._adapter.ApplyChanges();
        }

        public void DeleteCustomer(String id)
        {
            this._adapter.GetTable<Customer>().DeleteRow(new Customer() { Id = id });
            this._adapter.ApplyChanges();
        }
    }
}
To provide access to the new data layer add the following method to the Repository class:
public static IDataLayer GetDataLayer()
{
    DataModule module = new DataModule();
    // In more advanced scenarios, you could use an ObjectPool
    // to provide a pool of data modules instead of
    // instantiating a new data module for each request.

    return new DataLayer(module.DataAdapter);
}
At this point, the data access layer and the model classes are created and ready to be used. The next section describes the implementation of the ASP.NET MVC application itself.
ASP.NET MVC application
Add a new ASP.NET MVC project to the solution and name it MvcSample.Web. In the project properties, select an 'Empty' project template and check the option to add folders and core references for MVC.

Right click on the MvcSample.Web project and select 'Set as StartUp Project' and then add the MvcSample.Backend project to its references. Finally build the solution so the ASP.NET MVC helpers will know about model classes as we'll need that in a moment.
The next step is to add an empty controller named CustomersController. Right-click on the Controllers folder of the ASP.NET MVC project and select the Add... -> Controller menu item.
Chose an empty controller and set its name to CustomersController.
The controller class implementation is really simple (for now). Careful, if you forget to pass the data object to this.View you will get a Object reference not set to an instance of an object error:
using System.Collections.Generic;
using System.Web.Mvc;
using MvcSample.Backend.DataLayer;
using MvcSample.Backend.Model;

namespace MvcSample.Web.Controllers
{
    public class CustomersController : Controller
    {
        // GET: Customers
        public ActionResult Index()
        {
            IList<Customer> data = Repository.GetDataLayer().GetAllCustomers();

            return this.View(data);
        }
    }
}
Now create a view for the Index action. Right-click on the method source code and select the 'Add View...' menu item.
Use the List template and set the model class to Customer (MvcSample.Backend.Model).
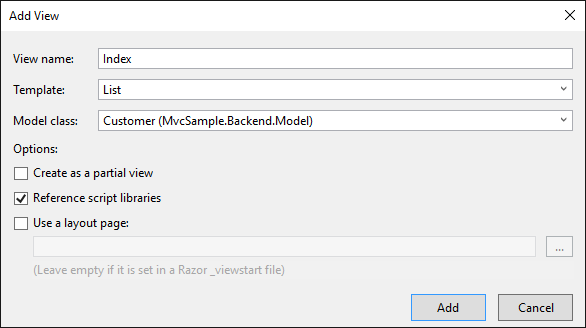
This will generate a view similar to the following:
@model IEnumerable<MvcSample.Backend.Model.Customer>

@{
    Layout = null;
}

<!DOCTYPE html>

<html>
<head>
    <meta name="viewport" content="width=device-width" />
    <title>Index</title>
</head>
<body>
    <p>
        @Html.ActionLink("Create New", "Create")
    </p>
    <table class="table">
        <tr>
            <th>
                @Html.DisplayNameFor(model => model.Name)
            </th>
            <th>
                @Html.DisplayNameFor(model => model.Phone)
            </th>
            <th>
                @Html.DisplayNameFor(model => model.Address)
            </th>
            <th>
                @Html.DisplayNameFor(model => model.Remarks)
            </th>
            <th>
                @Html.DisplayNameFor(model => model.Discount)
            </th>
            <th></th>
        </tr>

    @foreach (var item in Model) {
        <tr>
            <td>
                @Html.DisplayFor(modelItem => item.Name)
            </td>
            <td>
                @Html.DisplayFor(modelItem => item.Phone)
            </td>
            <td>
                @Html.DisplayFor(modelItem => item.Address)
            </td>
            <td>
                @Html.DisplayFor(modelItem => item.Remarks)
            </td>
            <td>
                @Html.DisplayFor(modelItem => item.Discount)
            </td>
            <td>
                @Html.ActionLink("Edit", "Edit", new { id=item.Id }) |
                @Html.ActionLink("Details", "Details", new { id=item.Id }) |
                @Html.ActionLink("Delete", "Delete", new { id=item.Id })
            </td>
        </tr>
    }

    </table>
</body>
</html>
The ASP.NET MVC application is not yet complete. The Customer route needs to be registered.
Open the App_Start\RouteConfig.cs file and correct the RegisterRoutes method by setting the controller to Customers:
using System;
using System.Collections.Generic;
using System.Linq;
using System.Web;
using System.Web.Mvc;
using System.Web.Routing;

namespace MvcSample.Web
{
    public class RouteConfig
    {
        public static void RegisterRoutes(RouteCollection routes)
        {
            routes.IgnoreRoute("{resource}.axd/{*pathInfo}");

            routes.MapRoute(
                     name: "Default",
                     url: "{controller}/{action}/{id}",
                     defaults: new { controller = "Customers", action = "Index", id = UrlParameter.Optional}
            );
        }
    }
}
Also, a line needs to be added to the Global.asax.cs file that will initialise the Data Abstract infrastructure when the web application starts up:
protected void Application_Start()
{
    AreaRegistration.RegisterAllAreas();
    RouteConfig.RegisterRoutes(RouteTable.Routes);

    MvcSample.Backend.DataLayer.Repository.Initialize();
}
Unfortunately, Data Abstract is unable to load the .daConnectionFile automatically because the Assembly.GetEntryAssembly() method used to determine the name of the .daConnections resource returns null for ASP.NET and ASP.NET MVC applications.
So the way connections are loaded has to be changed, open the Engine.cs class from the MvcSample.Backend project and change the Engine() constructor to the following:
public Engine()
{
    this.InitializeComponent();

    if (!RemObjects.DataAbstract.Server.Configuration.Loaded)
        RemObjects.DataAbstract.Server.Configuration.Load();

    System.Xml.XmlDocument connectionsXml = new System.Xml.XmlDocument();
    connectionsXml.Load(typeof(Engine).Assembly.GetManifestResourceStream(typeof(Engine).Assembly.GetName().Name +
                        @".MvcSample.Backend.daConnections"));
    this.connectionManager.LoadFromXml(connectionsXml);
}
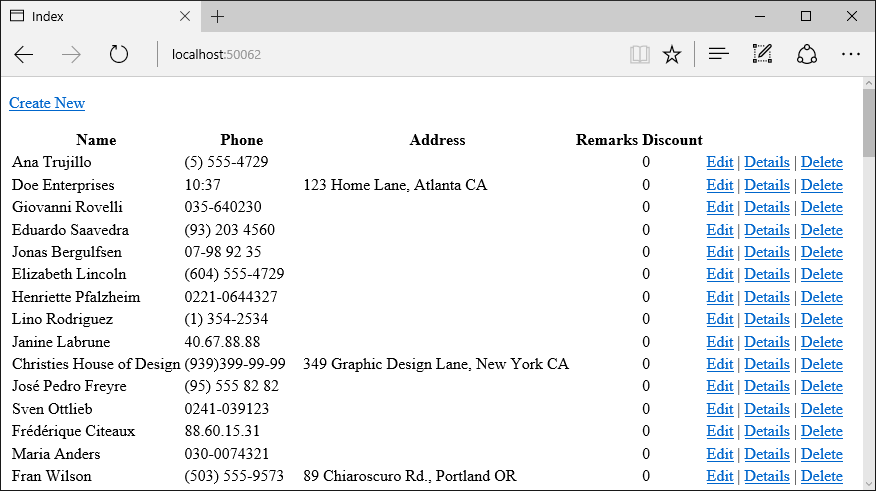
After this change you are now able to run ASP.NET MVC application. When you do you will see a list of Customers similar to below:
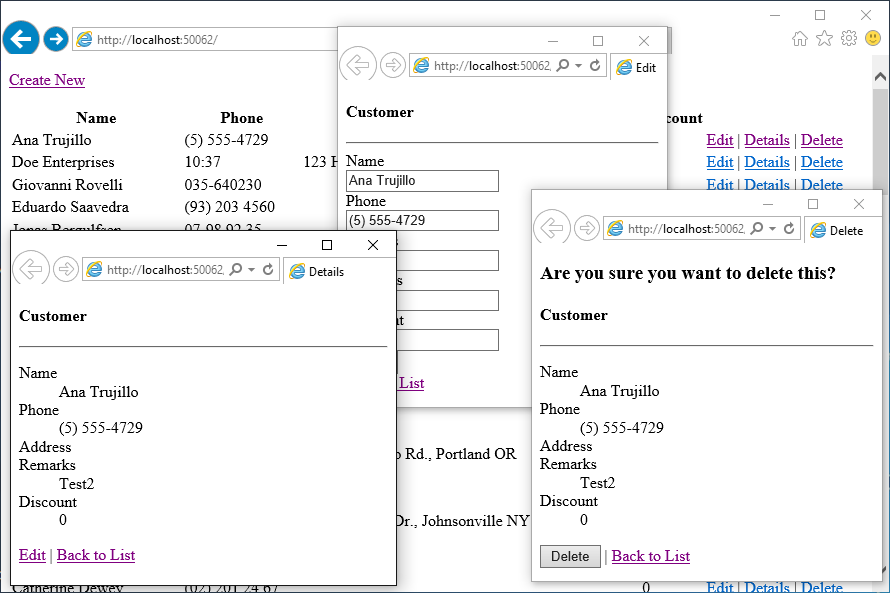
Improving the ASP.NET MVC application
The ASP.NET MVC application can be improved by adding more advanced functionality than just displaying an index of customers. In less than 5 minutes you can add all the code & views necessary to provide a means to edit a customer details, view a customers details and delete a customer.
First modify the controller class (CustomersController.cs) to add the required Action handlers for the edit, delete and update functionality:
using System;
using System.Collections.Generic;
using System.Web.Mvc;
using MvcSample.Backend.DataLayer;
using MvcSample.Backend.Model;

namespace MvcSample.Web.Controllers
{
    public class CustomersController : Controller
    {
        // GET: Customers
        public ActionResult Index()
        {
            IList<Customer> data = Repository.GetDataLayer().GetAllCustomers();

            return this.View(data);
        }

        public ActionResult Details(String id)
        {
            Customer customer = Repository.GetDataLayer().GetCustomer(id);

            return this.View(customer);
        }

        public ActionResult Edit(String id)
        {
            Customer customer = Repository.GetDataLayer().GetCustomer(id);

            return this.View(customer);
        }

        [HttpPost]
        public ActionResult Edit(Customer customer)
        {
            Repository.GetDataLayer().UpdateCustomer(customer);

            return this.RedirectToAction("Index");
        }

        public ActionResult Delete(String id)
        {
            Customer customer = Repository.GetDataLayer().GetCustomer(id);

            return this.View(customer);
        }

        [HttpPost]
        public ActionResult Delete(String id, FormCollection collection)
        {
            try
            {
                Repository.GetDataLayer().DeleteCustomer(id);

                return RedirectToAction("Index");
            }
            catch
            {
                return View();
            }
        }
    }
}
Next add Detail, Edit and Delete views to the web application in the same manner that the Index view was added. i.e. Right-click in the corresponding method in the Controller code, and then selecting the Add View... menu item; remembering to set the Template and Model Class values as appropriate.
This will create controller views similar to those below:
Details view
@model MvcSample.Backend.Model.Customer

@{
    Layout = null;
}

<!DOCTYPE html>

<html>
<head>
    <meta name="viewport" content="width=device-width" />
    <title>Details</title>
</head>
<body>
    <div>
        <h4>Customer</h4>
        <hr />
        <dl class="dl-horizontal">
            <dt>
                @Html.DisplayNameFor(model => model.Name)
            </dt>

            <dd>
                @Html.DisplayFor(model => model.Name)
            </dd>

            <dt>
                @Html.DisplayNameFor(model => model.Phone)
            </dt>

            <dd>
                @Html.DisplayFor(model => model.Phone)
            </dd>

            <dt>
                @Html.DisplayNameFor(model => model.Address)
            </dt>

            <dd>
                @Html.DisplayFor(model => model.Address)
            </dd>

            <dt>
                @Html.DisplayNameFor(model => model.Remarks)
            </dt>

            <dd>
                @Html.DisplayFor(model => model.Remarks)
            </dd>

            <dt>
                @Html.DisplayNameFor(model => model.Discount)
            </dt>

            <dd>
                @Html.DisplayFor(model => model.Discount)
            </dd>

        </dl>
    </div>
    <p>
        @Html.ActionLink("Edit", "Edit", new { id = Model.Id }) |
        @Html.ActionLink("Back to List", "Index")
    </p>
</body>
</html>
Edit view
@model MvcSample.Backend.Model.Customer

@{
    Layout = null;
}

<!DOCTYPE html>

<html>
<head>
    <meta name="viewport" content="width=device-width" />
    <title>Edit</title>
</head>
<body>
    <script src="~/Scripts/jquery-1.10.2.min.js"></script>
    <script src="~/Scripts/jquery.validate.min.js"></script>
    <script src="~/Scripts/jquery.validate.unobtrusive.min.js"></script>


    @using (Html.BeginForm())
    {
        @Html.AntiForgeryToken()

        <div class="form-horizontal">
            <h4>Customer</h4>
            <hr />
            @Html.ValidationSummary(true, "", new { @class = "text-danger" })
            @Html.HiddenFor(model => model.Id)

            <div class="form-group">
                @Html.LabelFor(model => model.Name, htmlAttributes: new { @class = "control-label col-md-2" })
                <div class="col-md-10">
                    @Html.EditorFor(model => model.Name, new { htmlAttributes = new { @class = "form-control" } })
                    @Html.ValidationMessageFor(model => model.Name, "", new { @class = "text-danger" })
                </div>
            </div>

            <div class="form-group">
                @Html.LabelFor(model => model.Phone, htmlAttributes: new { @class = "control-label col-md-2" })
                <div class="col-md-10">
                    @Html.EditorFor(model => model.Phone, new { htmlAttributes = new { @class = "form-control" } })
                    @Html.ValidationMessageFor(model => model.Phone, "", new { @class = "text-danger" })
                </div>
            </div>

            <div class="form-group">
                @Html.LabelFor(model => model.Address, htmlAttributes: new { @class = "control-label col-md-2" })
                <div class="col-md-10">
                    @Html.EditorFor(model => model.Address, new { htmlAttributes = new { @class = "form-control" } })
                    @Html.ValidationMessageFor(model => model.Address, "", new { @class = "text-danger" })
                </div>
            </div>

            <div class="form-group">
                @Html.LabelFor(model => model.Remarks, htmlAttributes: new { @class = "control-label col-md-2" })
                <div class="col-md-10">
                    @Html.EditorFor(model => model.Remarks, new { htmlAttributes = new { @class = "form-control" } })
                    @Html.ValidationMessageFor(model => model.Remarks, "", new { @class = "text-danger" })
                </div>
            </div>

            <div class="form-group">
                @Html.LabelFor(model => model.Discount, htmlAttributes: new { @class = "control-label col-md-2" })
                <div class="col-md-10">
                    @Html.EditorFor(model => model.Discount, new { htmlAttributes = new { @class = "form-control" } })
                    @Html.ValidationMessageFor(model => model.Discount, "", new { @class = "text-danger" })
                </div>
            </div>

            <div class="form-group">
                <div class="col-md-offset-2 col-md-10">
                    <input type="submit" value="Save" class="btn btn-default" />
                </div>
            </div>
        </div>
    }

    <div>
        @Html.ActionLink("Back to List", "Index")
    </div>
</body>
</html>
Delete view
@model MvcSample.Backend.Model.Customer

@{
    Layout = null;
}

<!DOCTYPE html>

<html>
<head>
    <meta name="viewport" content="width=device-width" />
    <title>Delete</title>
</head>
<body>
    <h3>Are you sure you want to delete this?</h3>
    <div>
        <h4>Customer</h4>
        <hr />
        <dl class="dl-horizontal">
            <dt>
                @Html.DisplayNameFor(model => model.Name)
            </dt>

            <dd>
                @Html.DisplayFor(model => model.Name)
            </dd>

            <dt>
                @Html.DisplayNameFor(model => model.Phone)
            </dt>

            <dd>
                @Html.DisplayFor(model => model.Phone)
            </dd>

            <dt>
                @Html.DisplayNameFor(model => model.Address)
            </dt>

            <dd>
                @Html.DisplayFor(model => model.Address)
            </dd>

            <dt>
                @Html.DisplayNameFor(model => model.Remarks)
            </dt>

            <dd>
                @Html.DisplayFor(model => model.Remarks)
            </dd>

            <dt>
                @Html.DisplayNameFor(model => model.Discount)
            </dt>

            <dd>
                @Html.DisplayFor(model => model.Discount)
            </dd>

        </dl>

        @using (Html.BeginForm()) {
            @Html.AntiForgeryToken()

            <div class="form-actions no-color">
                <input type="submit" value="Delete" class="btn btn-default" /> |
                @Html.ActionLink("Back to List", "Index")
            </div>
        }
    </div>
</body>
</html>
Conclusion
This tutorial took you through building a simple ASP.NET MVC application that gets its data via Data Abstract. All the details related to the data access layer are hidden behind a simple interface, which keeps the mechanics of interacting with the database completely hidden and means that the ASP.NET MVC web application doesn't contain any Data Abstract-related code.
This allows the web designers / developers to focus purely on the needs of the webpage and not the interaction with the server.
Only minimal changes to the Data Abstract class library were needed because of ASP.NET MVC specifics.