Commands sample (desktop) (Delphi)
The Commands sample demonstrates executing remote schema commands from a client application that will insert, update and delete a record from a table in an instance of Relativity Server.
Getting Started
The sample is located in C:\Users\Public\Documents\RemObjects Samples\Data Abstract for Delphi\Commands.
To build it, you will need a Delphi RAD Studio and like all the samples provided with Data Abstract for Delphi you will need to be running Relativity Server with the DASamples Domain and the Simple Schema available.
Running the Sample
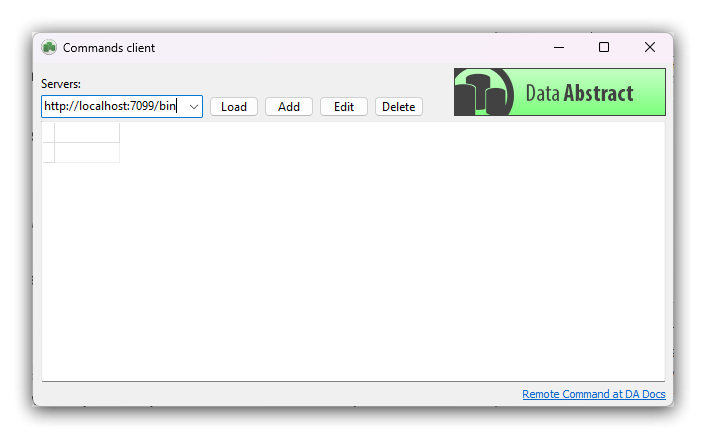
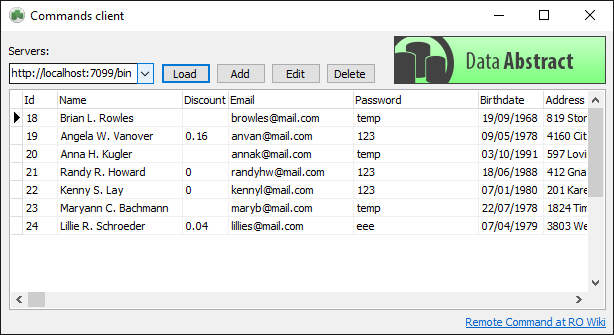
When the sample starts it displays a window with an empty area and a toolbar with a combo box and 4 buttons. The empty area will display a table of data retrieved from the schema. Pressing the "Load" button will attempt to retrieve data from the "Clients" schema table at the server address specified in the combo box.
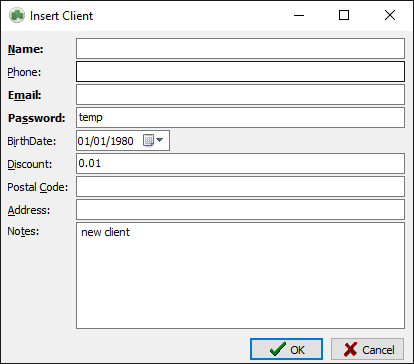
Pressing the "Add" will open a dialog box into which you can add details for a new "Client". When the "OK" button is pressed the data is passed to the server along with the name of the schema command to execute (Clients_INSERT) and the table data is freshly retrieved to show the schema contains the new data.
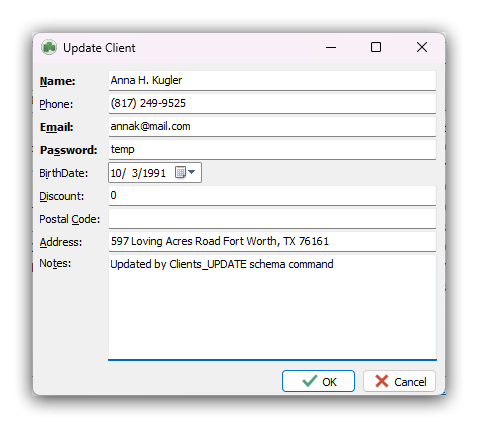
Pressing the "Edit" button while a row is selected will open a similar dialog with the fields containing the selected row's data. Make a change and press "OK", at which point the field data is passed to the Clients_UPDATE schema command, and the data again retrieved to demonstrate that the field(s) has correctly updated with the data.
Finally pressing the "Delete" button will display a confirmation dialog asking if you are sure you wish to delete the currently selected row. If you click "OK" then the id of that row is passed to the Clients_DELETE schema command and the data retrieved to show that the row has been deleted.
Examining the Code
The sample is comprised of three classes; the ClientDataModule handles all interaction with the schema and is the focus of the code below. ClientForm handles the main user interface and ClientUpdate handles the dialog used to add a new row or edit the data of an existing row.
The "Clients" schema table used in this sample contains ten fields which are all displayed in the table, and the values from the fields are all visible when editing a row.
The sample also demonstrates a use of DA SQL to retrieve the table data using a simple SQL statement.
Looking at the Commands
Before stepping through the code, we shall take a detour and use Schema Modeler to examine the commands that are used in the following sections. If you open Relativity Admin Tool, navigate to the Simple schema and press the "Open in Schema Modeler" button. This opens Schema Modeler with the selected schema. There you can see a folder titled "Commands" which contains all of the commands that are available in this schema.
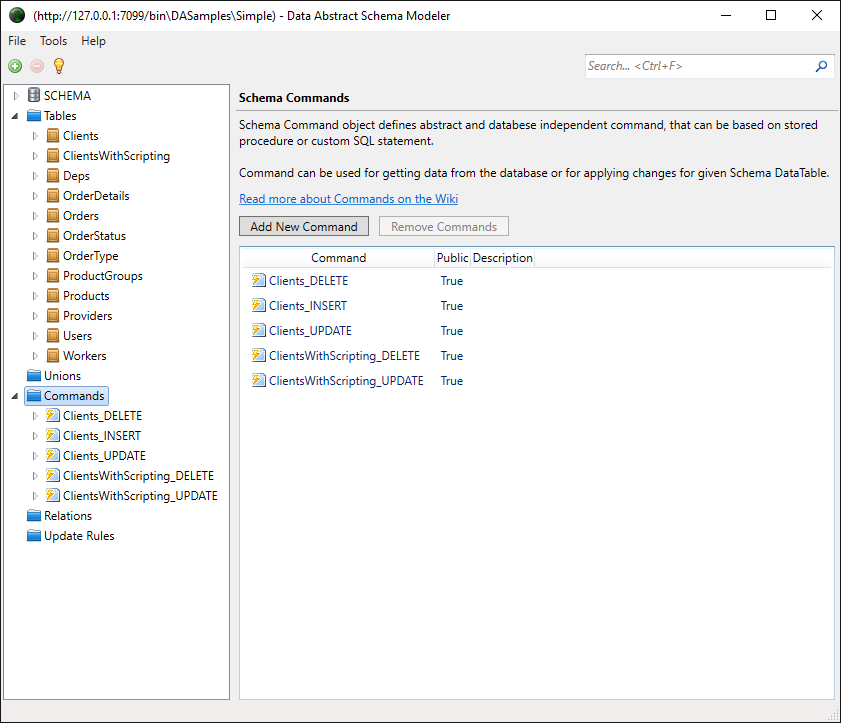
The name of each command describes the table it affects and what the action is to ensure that is no confusion. Clicking the disclosure triangle beside the command name allows you to drill down into the details of the command; including the parameters that the command takes and the statement object that defines the mapping between the schema table and the database table.
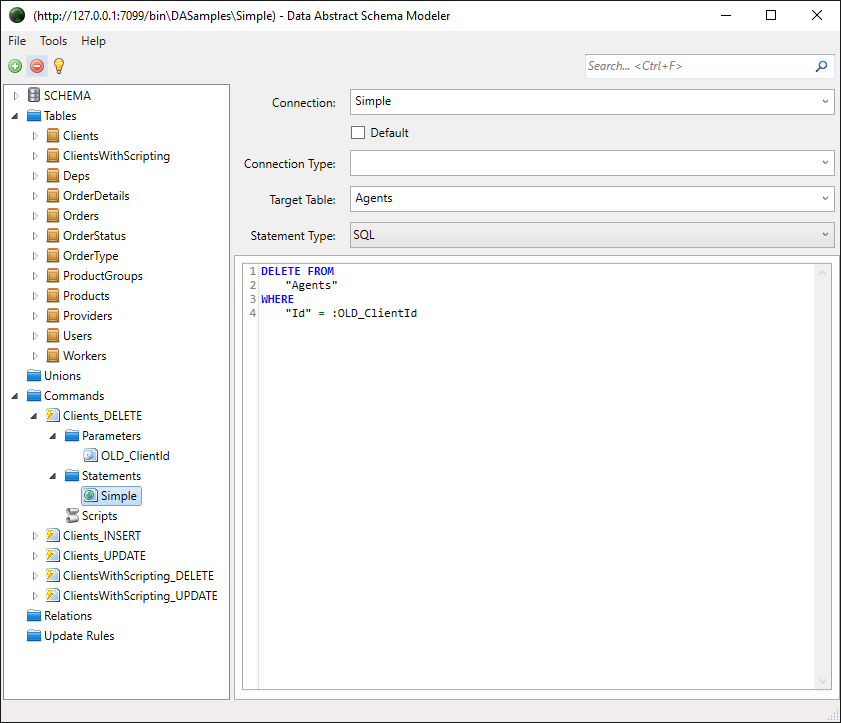
In the figure below you can see that the Clients_DELETE command takes a single parameter OLD_ClientId and uses a custom SQL statement that uses that parameter to try and match against the table's Id field and then delete that row from the Agents table (The Clients schema table is mapped to the Agents database table)
Next we shall look at using the commands.
Using the INSERT command
Before we can execute the Clients_INSERT command to insert a new record into the table, we need to create an array of DataParameter objects that match the parameters defined for the command in the schema. Each DataParameter is comprised of a Name that must match one of the parameter names, and a Value object that we want to set the data to. If you fail to provide one of the parameters defined in the schema then a null value will instead be inserted for that parameter in the database table.
The array of parameters is passed to the Execute function of TDARemoteCommand, along with the name of the command we want to execute as a string; here "Clients_INSERT". The Execute function will return an integer value which indicates if the command was successfully executed (It returns a 1) or if it failed (It returns a 0).
Note that if you supply an invalid command name or parameter name then an exception will be thrown and should be handled as appropriate.
Having executed the command, the sample closes and reopens the table which will retrieve the data again from the schema.
// fClientDataModule.pas

function TClientDataModule.InsertClient(aClientName: string; aClientDiscount: double; aClientEmail: string;
  aClientPassword: string;aClientBirthdate: DateTime; aClientPhone:string;
  aClientPostalCode:string;aClientAddress: string; aClientNotes: string): Boolean;
var
  ldp: DataParameterArray;
  lp: DataParameter;
begin
  ldp := DataParameterArray.Create;
  try
    lp := ldp.Add; lp.Name := 'ClientName';lp.Value := aClientName;
    lp := ldp.Add; lp.Name := 'ClientDiscount';lp.Value := aClientDiscount;
    lp := ldp.Add; lp.Name := 'ClientEmail';lp.Value := aClientEmail;
    lp := ldp.Add; lp.Name := 'ClientPassword';lp.Value := aClientPassword;
    lp := ldp.Add; lp.Name := 'ClientBirthdate';lp.Value := aClientBirthdate;
    lp := ldp.Add; lp.Name := 'ClientPhone';lp.Value := aClientPhone;
    lp := ldp.Add; lp.Name := 'ClientPostalCode';lp.Value := aClientPostalCode;
    lp := ldp.Add; lp.Name := 'ClientAddress';lp.Value := aClientAddress;
    lp := ldp.Add; lp.Name := 'ClientNotes';lp.Value := aClientNotes;
    Result := RemoteCommand.Execute('Clients_INSERT',ldp) > 0;
  finally
    ldp.Free;
  end;
end;
Using the UPDATE command
When the "Edit" button is pressed it opens the fClientUpdate dialog with the details of the selected row. When the "OK" button is pressed the values are passed to the UpdateClient function of ClientDataModule.
In this step a number of the fields in the previously created DataParameterArray are updated with new values, two of the parameters are deleted, and an additional one is added which is the ClientID we retrieved at the end of the previous step.
As before an array of parameters is created and passed to the Execute function of the TDARemoteCommand, this time with the command name Clients_UPDATE. A result of 1 is returned if the command was successful and a 0 if it failed.
Note that if you supply an invalid command name or parameter name then an exception will be thrown and should be handled as appropriate.
Having executed the command, the sample closes and reopens the table which will retrieve the data again from the schema.
// fClientDataModule.pas

function TClientDataModule.UpdateClient(aClientID: integer; aClientName: string;
  aClientDiscount: double; aClientEmail, aClientPassword: string;
  aClientBirthdate: DateTime; aClientPhone, aClientPostalCode, aClientAddress,
  aClientNotes: string): Boolean;
var
  ldp: DataParameterArray;
  lp: DataParameter;
begin
  ldp := DataParameterArray.Create;
  try
    lp := ldp.Add; lp.Name := 'ClientName';lp.Value := aClientName;
    lp := ldp.Add; lp.Name := 'ClientDiscount';lp.Value := aClientDiscount;
    lp := ldp.Add; lp.Name := 'ClientEmail';lp.Value := aClientEmail;
    lp := ldp.Add; lp.Name := 'ClientPassword';lp.Value := aClientPassword;
    lp := ldp.Add; lp.Name := 'ClientBirthdate';lp.Value := aClientBirthdate;
    lp := ldp.Add; lp.Name := 'ClientPhone';lp.Value := aClientPhone;
    lp := ldp.Add; lp.Name := 'ClientPostalCode';lp.Value := aClientPostalCode;
    lp := ldp.Add; lp.Name := 'ClientAddress';lp.Value := aClientAddress;
    lp := ldp.Add; lp.Name := 'ClientNotes';lp.Value := aClientNotes;
    lp := ldp.Add; lp.Name := 'OLD_ClientID';lp.Value := aClientID;
    Result := RemoteCommand.Execute('Clients_UPDATE',ldp) > 0;
  finally
    ldp.Free;
  end;
end;
Using the DELETE command
When the "Delete" button is pressed, a confirmation dialog is show to confirm that the user does indeed want to delete the selected row. If they are sure the ClientID of the selected row is passed to the DeleteClient function of ClientDataModule.
To delete a record from the Clients table, the sample uses the Execute function passing the name of the delete command (Clients_DELETE) as well as an array that contains only the passed in ClientID value.
// fClientDataModule.pas

function TClientDataModule.DeleteClient(aClientID: integer): Boolean;
var
  ldp: DataParameterArray;
  lp: DataParameter;
begin
  ldp := DataParameterArray.Create;
  try
    lp := ldp.Add; lp.Name := 'OLD_ClientID';lp.Value := aClientID;
    Result := RemoteCommand.Execute('Clients_DELETE',ldp) > 0;
  finally
    ldp.Free;
  end;
end;