Commands sample (Java)
The Commands console sample demonstrates executing remote schema Commands from a client application to insert, update and delete a record from a data table in an instance of Relativity Server.
Getting Started
The Commands sample is installed in C:\Users\Public\Documents\RemObjects Samples\Data Abstract for Java\Java\Console\.
To build it you can either build & execute it from the command line or make use of the provided Eclipse .classpath and .project files.
If using the command line remember that you will need to explicitly include the two jar files provided by the Data Abstract for Java package in the classpath. So for example to build and run this sample you'll need:
- Build:
javac -cp "C:/Program Files/RemObjects Software/Data Abstract for Java/Bin/com.remobjects.dataabstract.jar";"C:/Program Files/RemObjects Software/Data Abstract for Java/Bin/com.remobjects.sdk.jar";src src\com\remobjects\dataabstract\samples\commands\Program.java - Execute:
java -cp "C:/Program Files/RemObjects Software/Data Abstract for Java/Bin/com.remobjects.dataabstract.jar";"C:/Program Files/RemObjects Software/Data Abstract for Java/Bin/com.remobjects.sdk.jar";src com.remobjects.dataabstract.samples.commands.Program
Like all the samples provided with Data Abstract for Java you will need to be running the Relativity Server with the DASamples Domain and the Simple Schema available.
Lastly this sample makes use of a convenience class (DataTableExtension) which is provided with Data Abstract for Java. It provides a single public method LogToString that takes a DataTable and converts its contents into a String in a pretty fashion that could be logged to a console or into a file. Please note that this class extension is intended for test purposes only.
Running the Sample
When run the sample sets up a connection to an instance of Relativity Server and logs in (Step 1).
It then creates a collection of DataParameters that correlates to fields that make up a row in the "Clients" table with the values to be inserted. The "Clients_INSERT" command is then executed on the server, along with an array of the DataParameter and the result is printed out. A DA SQL statement is then issued to retrieve the newly added row (Step 2).
Modifications are then made to the DataParameters and passed along to the server along with the name of the "Clients_UPDATE" command. A DA SQL statement is again executed to retrieve the modified row (Step 3).
Lastly the "Clients_DELETE" command is executed with the "Id" of the newly added row. A DA SQL statement is executed to demonstrate that the row is no longer a part of the table (Step 4).
Examining the Code
All of the code can be found in the Program.java source file.
Looking at the Commands
Before stepping through the code, we shall take a detour and use Schema Modeler to examine the commands that are used in the next sections. If you open Relativity Admin Tool, navigate to the Simple schema and click on the "Open in Schema Modeler" button. After Schema Modeler opens navigate to the "Commands" folder which contains all of the commands that are available in this schema.
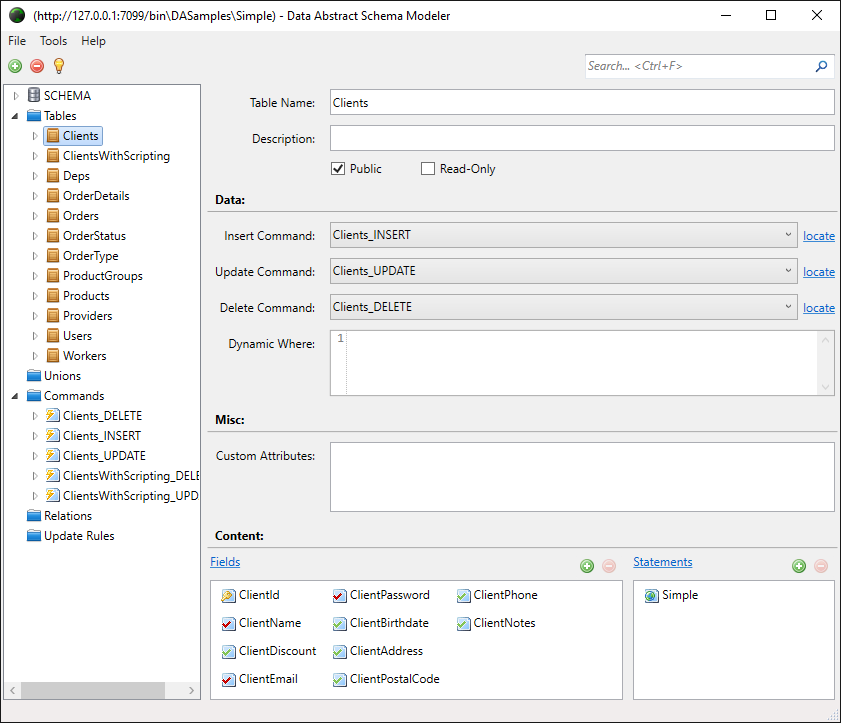
Each command's name describes the table it affects and what the action is to ensure that is no confusion. Clicking the disclosure triangle beside the command name allows you to drill down into the details of the command; including the parameters that the command takes and the statement object that defines the mapping between the schema table and the database table.
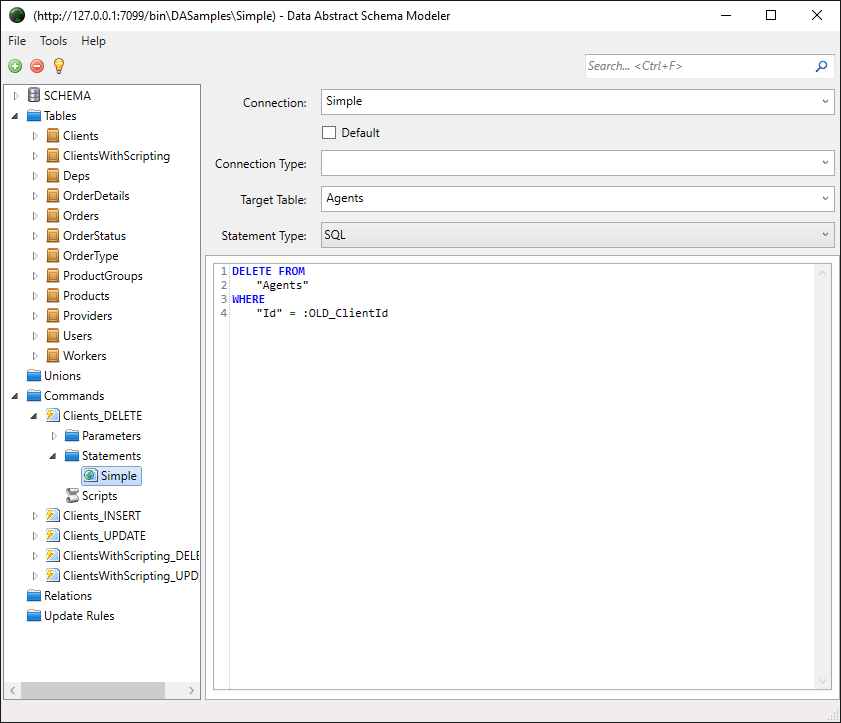
In the figure below you can see that the Clients_DELETE command takes a single parameter OLD_ClientId and uses a custom SQL statement that uses that parameter to try and match against the table's Id field and delete that row from the Agents table (The Clients schema table is mapped to the Agents database table)
Next we shall look at using the commands.
Setting up a Connection & Logging in (Step 1)
There are three stages to setting up a connection to an instance of Relativity Server.
In the first stage we initialize the underlying services that we will use to establish the connection to the server. The BinMessage is a message type that will be used to encode the data as a message. The HttpClientChannel is the communications channel over which the data will be sent, here we are establishing that it uses "HTTP" and specifying the address of the server. Finally an instance of Bin2DataStreamer is created which will handle the encoding and decoding of the data packets being transmitted.
The second stage is to configure a RemoteDataAdapter object that we interact with to communicate with the server. After it's created you pass it the three objects we created previously and set the DataServiceName and LoginServiceName. At this point we have a working connection but we will be unable to manipulate the schema data until we log in. Attempting to do so will cause an ROException exception to be thrown with the message "Session could not be found.".
The final stage passes a special login string (lLoginString) to the login method to establish a login session. The login method returns a boolean which will be true if the login attempt was successful or false if it failed. The login string is comprised of 4 parts:
- Username the username to attempt to login with
- Password the password to use
- Domain the name of the domain that the schema is located in
- Schema the name of the schema we wish to use
For example, the login string from this sample is "User Id=simple;Password=simple;Domain=DASamples;Schema=Simple"
NOTE If there is a problem attempting to communicate with the server, or if the schema or domain name is incorrect then an ROException will be thrown and should be handled appropriately.
BinMessage lMessage = new BinMessage();
HttpClientChannel lChannel = new HttpClientChannel();
try {
    lChannel.setTargetUrl(new URI("http://localhost:7099/bin"));
} catch (URISyntaxException e1) {
    e1.printStackTrace();
    return;
}
System.out.println(String.format("Target URL is %s", lChannel
        .getTargetUrl().toString()));

System.out.println("RO SDK layer is configured.");

Bin2DataStreamer lDataStreamer = new Bin2DataStreamer();
RemoteDataAdapter lDataAdapter = new RemoteDataAdapter();
lDataAdapter.setDataStreamer(lDataStreamer);
lDataAdapter.setMessage(lMessage);
lDataAdapter.setClientChannel(lChannel);
lDataAdapter.setDataServiceName("DataService");
lDataAdapter.setLoginServiceName("LoginService");

System.out.println("RO DataAbstract layer is configured.");

System.out.println("");
System.out.println("");
System.out.println("STEP 1: Login to DataService");
String RelativityConnectionStringTemplate = "User Id=\"%s\";Password=\"%s\";Domain=\"%s\";Schema=\"%s\"";
String lLoginString = String.format(RelativityConnectionStringTemplate,
        "simple", "simple", "DASamples", "Simple");
System.out.print(String.format("Login string is %s", lLoginString));
Boolean lLogged = lDataAdapter.login(lLoginString);

if (lLogged) {
    System.out.println("Login has been successful. Going further...");
} else {
    System.out
            .println("Cannot login. Please check your user name  and password. Exiting...");
    return;
}
Using DA SQL to selectively retrieve a row
In each of the following steps, after the command has been executed the sample retrieves (or attempts to retrieves in the case of Step 4) the newly added row from the Clients table to demonstrate the changes to the table. To do this the sample makes use of DA SQL which provides a means of executing SQL statements on the schema data.
Two different SQL requests are used; the first, used in Step 2, retrieves any rows where ClientName, ClientEmail and ClientPassword are certain values. The second, used in Steps 3 and 4, matches against any row that has the matching clientid.
// Step 2
String sqlTemplate = "SELECT ClientId, ClientName, ClientPhone, ClientNotes FROM Clients WHERE ClientName = '%s' AND ClientEmail = '%s' AND ClientPassword = '%s'";
String lDASql = String.format(sqlTemplate, dpClientName.getValue()
                .getAsString(), dpClientEmail.getValue().getAsString(),
                dpClientPassword.getValue().getAsString());

// Step 3 & 4
lDASql = String.format("SELECT ClientId, ClientName, ClientPhone, ClientNotes FROM clients WHERE clientid = %d", lClientID);
A DataTable object is created that will hold the results from the server. The name passed to the constructor should be the name of the table you wish to retrieve data from; here it is "Clients".
DataTable lClientsData = new DataTable("Clients");
Next a TableRequestInfoV6 object is created which will be used to specify custom parameters for the data request. Passing "-1" to setMaxRecords requests that all of the table's records are returned, if a positive value is passed then the number of records is limited to that. To request the schema to be returned in the results "true" needs to be passed to the setIncludeSchema method. Finally to pass the DA SQL statement use the setSql method.
TableRequestInfoV6 lRequestInfoV6 = new TableRequestInfoV6();
lRequestInfoV6.setMaxRecords(-1);
lRequestInfoV6.setIncludeSchema(true);
lRequestInfoV6.setSql(lDASql);
Finally to retrieve the data we pass the TableRequestInfoV6 and DataTable to the fill method of RemoteDataAdapter which executes in a synchronous fashion delaying further processing until the request completes. Once the data has been retrieved it is printed to the console.
lDataAdapter.fill(lClientsData, lRequestInfoV6);
An alternative option to request the data using fillAsync is shown in Working Asynchronously with the Remote Data Adapter.
Inserting a Record (Step 2)
When inserting a new row into a table you need to provide at a minimum any required fields, along with any additional fields you feel are needed. If no value is provided for a field then a null value will be inserted into the database.
A DataParameter needs to be created for each field that you want to provide data for. The constructor used here takes two parameters; the first is the string name of the schema field, the second parameter is the value to be assigned to the field in the schema. Note that the value passed to the second parameter can be any object needed like a String, Date or Float.
DataParameter dpClientName = new DataParameter("ClientName", "Jane C.");
DataParameter dpClientDiscount = new DataParameter("ClientDiscount",
        0.01);
DataParameter dpClientEmail = new DataParameter("ClientEmail",
        "test@gmail.com");
DataParameter dpClientPassword = new DataParameter("ClientPassword",
        "temp");
@SuppressWarnings("deprecation")
DataParameter dpClientBirthday = new DataParameter("ClientBirthdate",
        new Date(1973, 6, 1));
DataParameter dpClientPhone = new DataParameter("ClientPhone",
        "Unknown yet");
DataParameter dpPostalCode = new DataParameter("ClientPostalCode",
        "???");
DataParameter dpClientAddress = new DataParameter("ClientAddress",
        "Somewhere in Texas...");
DataParameter dpClientNotes = new DataParameter("ClientNotes",
        "Added by command");
To pass the parameters to the server they need to be wrapped in an array which is then passed to the executeCommand along with the name of the command to be executed ("Clients_INSERT").
DataParameter[] lArrayDataParametr = new DataParameter[] {
        dpClientName, dpClientDiscount, dpClientEmail,
        dpClientPassword, dpClientBirthday, dpClientPhone,
        dpPostalCode, dpClientAddress, dpClientNotes };

RemoteCommandResult lResultCommand = lDataAdapter.executeCommand(
        "Clients_INSERT", lArrayDataParametr);
When the command is complete it returns a result value as a RemoteCommandResult object. The result code can be extracted and tested to see if the command succeeded. In this sample, the result is printed to the console after each command is executed.
System.out.println(String.format("Done with result: %s", lResultCommand
                .getResultCode().toString()));
Updating a Record (Step 3)
Updating a field is as simple as sending changing the value in the DataParameter and passing those changed parameters to the executeCommand.
Here some of the previously created DataParameters are assigned a new value using the setValue method. The new value must be wrapped in a VariantType object. A new parameter ("OLD_ClientId") is also created that contains the id value that was assigned to the newly created row by the server after the insert command was executed.
dpClientName.setValue(new VariantType("Jane Colins"));
dpClientDiscount.setValue(new VariantType(0.05));
dpClientPhone.setValue(new VariantType("(095) 636-19-63"));
dpClientNotes.setValue(new VariantType("Updated by command"));
dpClientEmail.setValue(new VariantType("janec@gmail.com"));
dpClientPassword.setValue(new VariantType("djCkU"));
dpClientAddress.setValue(new VariantType(
        "4935 Oliver Street Weatherford, TX 76086"));
DataParameter dpOldClientId = new DataParameter("OLD_ClientId",
        lClientID);
As before the parameters are added to a array and passed to the executeCommand along with the name of the command to be executed ("Clients_UPDATE").
lArrayDataParametr = new DataParameter[] { dpClientName,
        dpClientDiscount, dpClientPhone, dpClientNotes, dpClientEmail,
        dpClientPassword, dpClientAddress, dpOldClientId };

lResultCommand = lDataAdapter.executeCommand("Clients_UPDATE",
        lArrayDataParametr);
Deleting a Record (Step 4)
To delete a record from the Clients table, we execute the Clients_DELETE command passing an array that only contains the Id of the row to be deleted.
Here the dpOldClientId that was retrieved in Step 3 is added to a new DataParameter array and passed along with the name of the delete command (Clients_DELETE) to executeCommand.
lArrayDataParametr = new DataParameter[] { dpOldClientId };
lResultCommand = lDataAdapter.executeCommand("Clients_DELETE",
                lArrayDataParametr);
Example Output
This is an example of the output you will see when the sample is run. In Step 2 you see the result from adding the new row (a 1 represents success) and then the newly added row. In Step 3 you can see the newly modified row, and finally in Step 4 no table is printed out because the row was successfully deleted.
Commands sample has been started.
Target URL is http://localhost:7099/bin
RO SDK layer is configured.
RO DataAbstract layer is configured.
STEP 1: Login to DataService
Login string is User Id="simple";Password="simple";Domain="DASamples";Schema="Simple"Login has been successful. Going further...
STEP 2. Call command for adding a new client row ...
Done with result: 1

Table: Clients (1 rows from 1)
|--------------------------------------------------------------------------|
|ClientId      |ClientName         |ClientPhone        |ClientNotes        |
|--------------------------------------------------------------------------|
|26            |Jane C.            |Unknown yet        |Added by command   |
|--------------------------------------------------------------------------|


STEP 3. Call command for modification client row ...
Done with result: 1

Table: Clients (1 rows from 1)
|--------------------------------------------------------------------------|
|ClientId      |ClientName         |ClientPhone        |ClientNotes        |
|--------------------------------------------------------------------------|
|26            |Jane Colins        |(095) 636-19-63    |Updated by comm... |
|--------------------------------------------------------------------------|


STEP 4. Call command for removing client row ...
Done with result: 1

DONE! Please press return to exit.