Mobile
The Simple Data Operations mobile sample demonstrates the most basic & common interactions you will make to an instance of Relativity Server. It shows how to:
- connect to the server
- retrieve a table from the server
- add a row to the retrieved table and apply that change to the server
- update/change the contents of a row and apply that change to the server
- delete a row from the table and apply that change to the server
Note that while this sample uses synchronous methods to communicate with the server, equivalent asynchronous methods are available. You can see an example of their usage in the SimpleDataOperationAsync sample.
Getting Started
The Desktop sample is typically located in /Developer/RemObjects Software/Samples/Data Abstract/Mobile/SimpleDataOperations, though you may have installed the Data Abstract for Cocoa and it's samples in another location.
To build it, you will of course need Xcode, and like all the samples provided with Data Abstract for Cocoa you will need to be running the Relativity Server with the DASamples Domain and the Simple Schema available.
Running the Sample
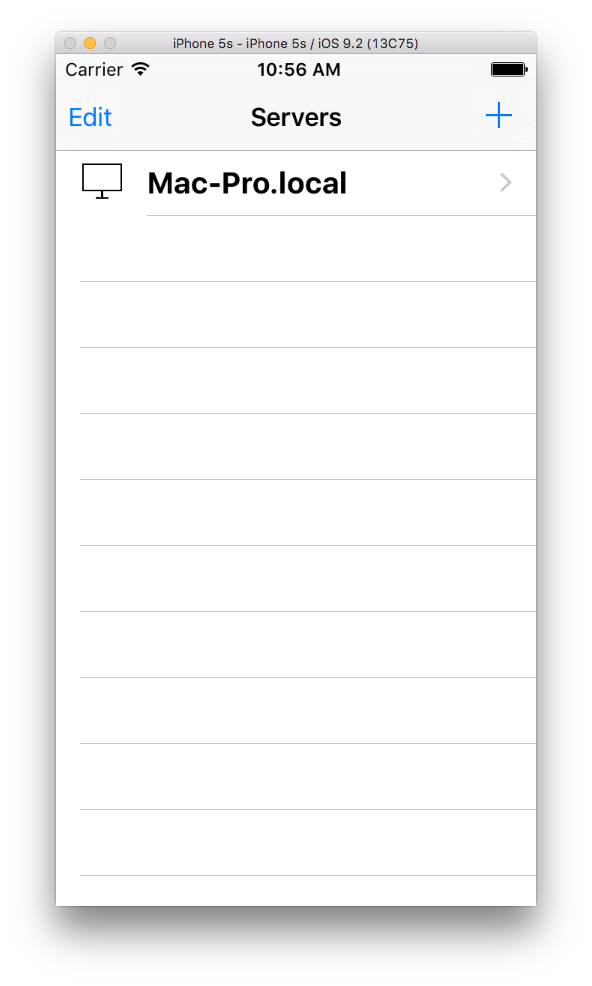
This sample allows you to add, edit or delete a department from the Deps table available in the Simple schema which is in the DASamples domain. When the sample loads it starts a Zeroconf discovery service that looks for instances of Relativity Server running on the local network. Any discovered servers will appear in the initial table, if no servers are discovered then you can specify a server address yourself by pressing the "+" button; you only need to supply the address the port number and http:// will be added for you.
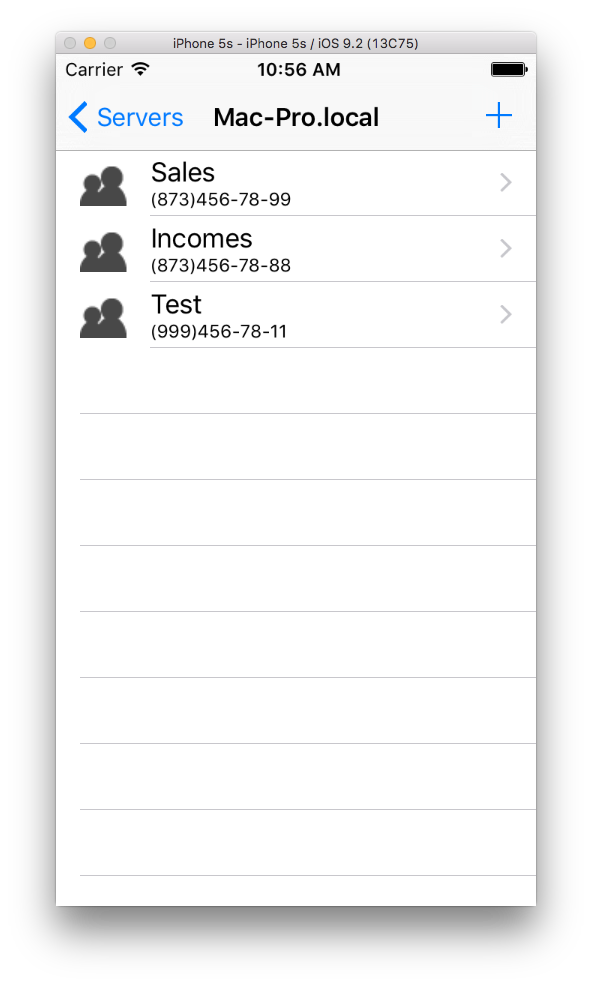
Touching a server name causes the app to retrieve and display all of the departments in the Deps table. To add a new department press the "+" button which will slide in a new page where you can fill in the details of the department; specifically its name and phone number. Pressing the "Save" button causes the record to be added both to the local copy of the table and also applied to the server.
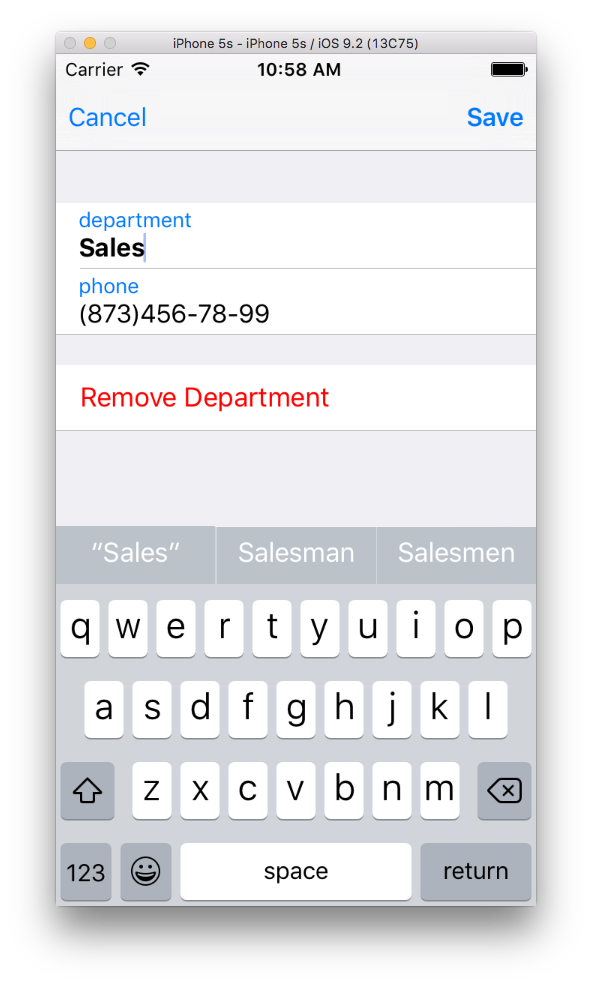
To edit a record simply press on the appropriate row. This will slide in a edit view filled with the details of the selected department. Pressing the "Save" button applies the changes to the local table and to the server as well, pressing "Cancel" discards any changes.
To delete a record from the table, you need to press on the record as if you are going to edit it, and then scroll down to the bottom of the view and press the "Remove Department" button.
Examining the Code
The focus of this section will be on the code for adding, editing and deleting a row; along with establishing a connection to an instance of Relativity Server.
The sample interacts with the Deps schema table which has has three fields:
DepIdthis is the primary key and use anAutoIncdata type.DepNameis a string of up to 50 characters and is required for each new rowDepPhoneis also a string of up to 50 characters, the field is optional.
If you want to examine the table and its parameters yourself, or if you want to see the data in the servers version of the table then you can use Server Explorer to examine it.
App Structure
The sample is built around six classes; AppDelegate, DataAccess, ServiceAccess, 'SimpleDataOperationsViewController', 'EditorViewController' and ServersViewController.
The DataAccess class handles everything related to interacting with the Data Abstract SDK; including retrieving data from an instance of Relativity Server and applying changes back to the server.
The ServiceAccess class handles the discovery of any instances of Relativity Server that are available on the local network using ROZeroConf which is a feature available with the Remoting SDK that Data Abstract is built upon. ServiceAccess sets up a ROZeroConfBrowser Class object which searches for any servers that broadcast a value matching the value defined for RELATIVITY_SERVICE_NAME. When a service is found, or indeed disappears, the server list is updated and the popup with the list of available servers is also updated. It also handles the registration of custom server addresses. To explore further the ServiceAccess class and Zeroconf discovery see the article: The ServiceAccess Class and Zeroconf discovery.
The ServersViewController class handles displaying the table of available servers (be they either discovered by Zeroconf, or manually added) and presenting a UIAlert to enter a server address when the "+" button is pressed. When an row is pressed, it configures the DataAccess class to set up a connection to the selected server and passes the name of that server to the SimpleDataOperationsViewController by implementing prepareForSegue:sender:.
The SimpleDataOperationsViewController class handles displaying the Deps table and transitioning to the EditorViewController. The prepareForSegue:sender: will pass in the details of the selected row if it is an edit action, otherwise it passes in a new empty row. When either the "Cancel", "Save" or "Remove Department" buttons are pressed on the EditorViewController it triggers the appropriate method in SimpleDataOperationsViewController (Remove Deparment: removeDepartment:, Add or Edit department: applyDepartmentChanges: or Cancel: cancelDepartmentChanges:) which calls beginApplyChanges in DataAccess.
The EditorViewController class handles the view for adding or editing a department.
Lastly the AppDelegate class is a stock version and has no customization.
Establishing a Connection
There are three stages to establishing a connection to an instance of Relativity Server.
The first stage sets up the basic connection to the server. We create two RORemoteServices objects (which are part of the Remoting SDK), the first is the data service which will be used to retrieve and update data and schema information. The login service defines the service that should be called if authentication is required. The loginService object is simply a copy of the dataService object, with the serviceName property changed to DEFAULT_LOGIN_SERVICE_NAME, it could be created like the dataService object, just passing in DEFAULT_LOGIN_SERVICE_NAME instead.
We then configure the DARemoteDataAdapter to use those two services by assigning them to the dataService and loginService properties of the DARemoteDataAdapter class. At this point we have a basic working connection.
The second stage is to implement the remoteDataAdapterNeedsLogin delegate method which is declared in the DARemoteDataAdapterDelegate protocol. This method is called when the DARemoteDataAdapter determines that a login session is required; i.e. when using a method to get the table data. Here we simply call the login method of DataAccess.m.
Lastly in the login method of DataAccess.m we compose a special login string (loginString) will will be passed to the DARemoteDataAdapters loginWithString method to establish a login session. The loginWithString method returns a boolean which will be true if the login attempt was successful or false if it failed. The login string is comprised of 4 parts:
- Username the username to attempt to login with
- Password the password to use
- Domain the name of the domain that the schema is located in
- Schema the name of the schema we wish to use
In this sample the final login string would be "User=simple;Password=simple;Domain=DASamples;Schema=Simple"
NOTE If there is a problem attempting to communicate with the server, or if the schema or domain name is incorrect then an ROException will be thrown and should be handled appropriately.
//DataAccess.m
- (void)setupConnectionWithService:(id)service {

    if (!service)
        return;

    RORemoteService * dataService;

    if ([service isKindOfClass:[NSNetService class]]) {
        NSNetService * netService = (NSNetService * )service;
        @try {
            dataService = [RORemoteService remoteServiceWithNetService:netService];
        }
        @catch (NSException * exception) {
            [self.delegate alertError:@"Connection problem" withDetails:exception.reason];
        }
    } else if ([service isKindOfClass:[RORemoteService class]]) {
        dataService = (RORemoteService * )service;
    }
    RORemoteService * loginService = [dataService copy];

    dataService.serviceName = DEFAULT_DATA_SERVICE_NAME;
    loginService.serviceName = DEFAULT_LOGIN_SERVICE_NAME;

    self.dataAdapter.dataService = dataService;
    self.dataAdapter.loginService = loginService;
}

//DataAccess.m
- (BOOL)remoteDataAdapterNeedsLogin:(DARemoteDataAdapter *)adapter {
    return [self login];
}

//DataAccess.m
- (BOOL)login {
    NSString * loginString = [NSString stringWithFormat:@"User=%@;Password=%@;Domain=%@;Schema=%@",
                             RELATIVITY_DATA_USER, RELATIVITY_DATA_PASSWORD, RELATIVITY_DOMAIN, RELATIVITY_SCHEMA];

    NSLog(@"Login with string: %@", loginString);
    return [self.dataAdapter loginWithString:loginString];
}
Retrieving a Table
To retrieve a copy of a table from the schema we need to use the getDataTable method of DARemoteDataAdapter which takes the name of the table as a string and returns a DADataTable.
Variants of getDataTable exist that allow you to retrieve only a subset of a table using an SQL statement, or Dynamic Select and Dynamic Where objects, or retrieve multiple tables at once. There are also asynchronous variants of all of the methods.
Here we spin off the call to getDataTable into a background dispatch queue. If getDataTable successfully returns then it will dispatch a notification to the main queue that the data is available, otherwise an alert will be displayed to indicate a failure.
NOTE Passing an invalid table name to the getDataTable method will result in an ROException being thrown which should be handled accordingly.
//DataAccess.m
- (void)beginLoadData {

    NSLog(@"Begin obtaining the data...");
    dispatch_async(dispatch_get_global_queue(DISPATCH_QUEUE_PRIORITY_BACKGROUND, 0), ^{

        DADataTable * result = nil;

        @try {
            result = [self.dataAdapter getDataTable:@"Deps"];
        }
        @catch (NSException * exception) {
            NSString * error = @"Error when downloading data";
            NSString * message = [NSString stringWithFormat:@"%@: %@", error, [exception reason]];
            NSLog(@"%@", message);
            [self.delegate alertError:error withDetails:[exception reason]];
        }

        dispatch_async(dispatch_get_main_queue(), ^{
            NSLog(@"Data has been retrieved.");
            self.dataTable = result;
            [[NSNotificationCenter defaultCenter] postNotificationName:NOTIFICATION_DATA_READY object:self];
        });
    });
}
Inserting a row
Each table is made up of multiple DADataTableRow objects. Each one representing a row in the schema table and its columns. To add a new row to the table, we use the addNewRow factory method of DADataTable which appends a new row to the table and returns a reference to it. The values for all of the columns will be initially set to null, except for any columns that use an AutoInc value in which case they will be assigned a negative value. The Id will be updated to the actual Id value after the changes have been applied to the server.
Here, when the "+" button is pressed it triggers a segue to the EditorViewController which in turn causes prepareForSegue:sender: to be called. It tests the segue identifier and if it matches "AddDepartment", then DataAccess addRow is called to add a new row to the table and then the new row is assigned to the departmentRow property of EditorViewController.
//DataAccess.m
- (DADataTableRow *)addRow {
    return [self.dataTable addNewRow];
}
Setting values in a field
To set a value for a field in a DADataTableRow, you use a dictionary accessor passing in the name of the key and assigning a string object as a value. For example to set the DepName field to "Security" we would use dataTableRow[@"DepName"] = @"Security".
In this sample when the user presses the "Save" button, it causes shouldPerformSegueWithIdentifier:sender: in EditorViewController to be called, when the identifier matches applyDepartmentChanges it calls the bindValuesToSource passing in true. bindValuesToSource assigns the values in the textDepartmentName & textDepartmentPhone textfields to the appropriate fields in the departmentRow object.
NOTE Passing an invalid column name to dictionary accessor would result in an ROException being thrown, however here the column name is retrieved and used as the fieldName..
//EditorViewController.m
- (void)bindValuesToSource:(BOOL)toSource {

    if (toSource) {
        self.departmentRow[@"DepName"] = self.textDepartmentName.text;
        self.departmentRow[@"DepPhone"] = self.textDepartmentPhone.text;
    } else {
        self.textDepartmentName.text = self.departmentRow[@"DepName"];
        self.textDepartmentPhone.text = self.departmentRow[@"DepPhone"];
    }
}
Deleting a row
To remove a row from a table you need to use the removeRow method which takes the DADataTableRow you want to remove. The change is added to the changedRows list, which is a list of all DADataTableRows that have modifications.
There is a variant of removeRow, removeRowAtIndex, that takes an index for the row you wish to delete; note that this index value is simply the position the row has in the table (starting from 0) and has no relation to any id value.
Here when the user presses the "Remove Department" button it causes the segue to unwind and call removeDepartment: in SimpleDataOperationsViewController. The row that was being edited is retrieved from EditorViewController and passed to the removeRow: method of DataAccess which in turn calls DADataTable's 'removeRow. At this point the row has been only removed from the local table, to remove it from the server as well the beginApplyChanges method is called.
// SimpleDataOperationsViewController.m
- (IBAction)removeDepartment:(UIStoryboardSegue * )unwindSegue {
    EditorViewController * editor = (EditorViewController * )unwindSegue.sourceViewController;
    [[DataAccess sharedInstance] removeRow:editor.departmentRow];
    [[DataAccess sharedInstance] beginApplyChanges];
    [self.tableView reloadData];
}

//DataAccess.m
- (void)removeRow:(DADataTableRow *)row {
    [self.dataTable removeRow:row];
}
Applying changes to the server
As noted earlier all of the changes made like adding, editing or deleting a row are only made on the local copy of the table until we apply those changes to the server. To do that we use the applyChangesForTable of DARemoteDataAdapter, it takes a DADataTable and extracts a delta of changes made to the table and passes that to the server. A delta of changes are then received from the server and merged into the local table.
Here the call of applyChangesForTable is executed from a background dispatch queue. If the call has a problem then an exception will be thrown which should be handled, here a message is logged to the console and an alert window shown. Otherwise if the call was successful then a notification is dispatched to the main thread that the data is available which will cause the table to be reloaded.
//DataAccess.m
- (void)beginApplyChanges {
    NSLog(@"Begin applying changes...");
    dispatch_async(dispatch_get_global_queue(DISPATCH_QUEUE_PRIORITY_BACKGROUND, 0), ^{

        @try {
            [self.dataAdapter applyChangesForTable:self.dataTable];
        }
        @catch (NSException * exception) {
            NSString * error = @"Error when applying changes";
            NSString * message = [NSString stringWithFormat:@"%@: %@", error, [exception reason]];
            NSLog(@"%@", message);
            [self.delegate alertError:error withDetails:[exception reason]];
        }

        dispatch_async(dispatch_get_main_queue(), ^{
            NSLog(@"Changes has been applied.");
            [[NSNotificationCenter defaultCenter] postNotificationName:NOTIFICATION_DATA_READY object:self];
        });
    });
}