DADataTableController
The DADataTableController desktop sample demonstrates how to use the DADataTableController helper class which is a bindings compatible class that can be used to manage a DADataTable and mediate between a view (NSTableView) and the model (DADataTable).
Getting Started
The Desktop sample is typically located in /Developer/RemObjects Software/Samples/Data Abstract/Desktop/DADataTableController, though you may have installed the Data Abstract for Cocoa and it's samples in another location.
To build it, you will of course need Xcode, and like all the samples provided with Data Abstract for Cocoa you will need to be running the Relativity Server with the DASamples Domain and the Simple Schema available.
Running the Sample
This sample shows just how easy it is to integrate DADataTableController into your code.
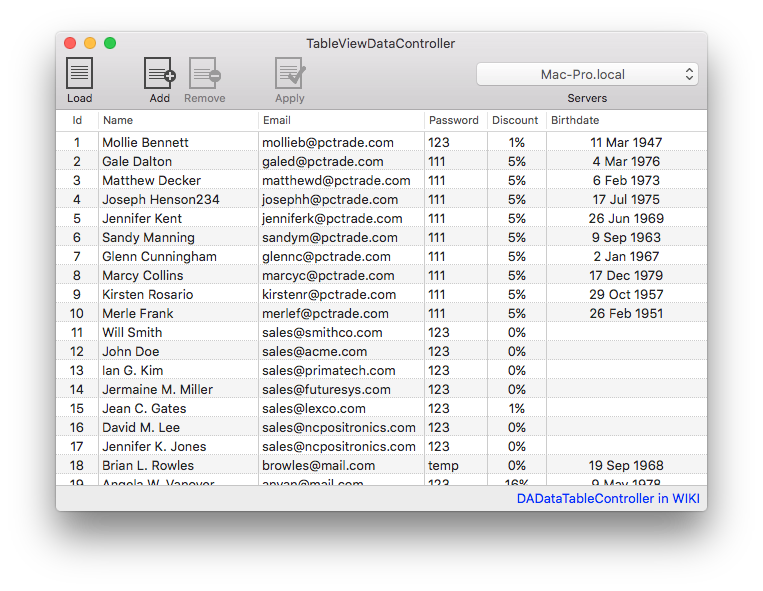
When you run the sample you will see an empty table, and a toolbar with 4 buttons and a popup. The "Load" button retrieves "Clients" table and displays the results in the table. The "Add" button adds a new row to the DADataTable. The "Remove" button will be enabled when a row is selected and will delete it from the local DADataTable. The "Apply" button sends a delta of the changes to the server and applies the changes there. Finally the "Servers" popup contains a list of available servers discovered by the Zeroconf discovery system. When the sample is run, it starts a Zeroconf discovery service that looks for instances of Relativity Server running on the local network. Any discovered servers will be added to the popup, if no servers are discovered then the dropbox on the toolbar will be empty. You can specify a server address yourself by clicking on the popup and then clicking on "Specify custom URL...".
Examining the Code
The code for creating the connection to the server and handling logging in is covered by other samples, likewise other samples cover manipulating the DADataTable and applying changes back to the server.
At its core the DADataTableController is inherited from NSArrayController and therefore acts in a similar manner. The main difference is that there is an additional property, table, which represents the DADataTable we want to manage with the DADataTableController class.
NOTE If the table name, or the field names do not exist then an ROException will be raised and should be handled appropriately.
App Structure
The sample is built around four classes; AppDelegate, DataAccess, ServiceAccess, and RegisterServiceWindowController.
The DataAccess class handles everything related to interacting with the Data Abstract SDK; including retrieving data from an instance of Relativity Server and applying changes back to the server.
The ServiceAccess class handles the discovery of any instances of Relativity Server that are available on the local network using ROZeroConf which is a feature available with the Remoting SDK that Data Abstract is built upon. ServiceAccess sets up a ROZeroConfBrowser Class object which searches for any servers that broadcast a value matching the value defined for RELATIVITY_SERVICE_NAME. When a service is found, or indeed disappears, the server list is updated and the popup with the list of available servers is also updated. It also handles the registration of custom server addresses. To explore further the ServiceAccess class and Zeroconf discovery see the article: The ServiceAccess Class and Zeroconf discovery.
The RegisterServiceWindowController class is a subclass of NSWindowController which handles the UI aspects of a user manually adding a server url.
Lastly the AppDelegate class handles the primary setup of the application, registers that it will listen for notifications broadcast by the ServiceAccess and DataAccess classes, and acts as a delegate to the RegisterServiceWindowController, DataAccess and NSTableView classes.
Setting up DADataTableController
Setting up your code to use the DADataTableController can be achieved in just a few steps.
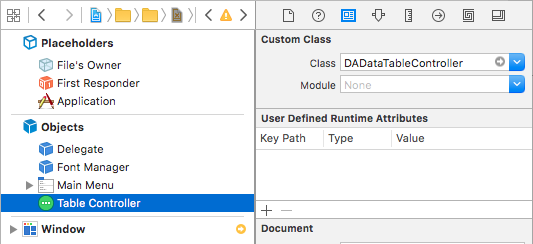
In your UI file, be it xib or Storyboard, add a Array Controller from the objects menu and set its "Custom Class" to DADataTableController. Switch to the "Attributes Inspector" and specify the keys (the field names in the table) that will be used.

The for each column in your table view, switch to the "Bindings Inspector" and enter the name of the appropriate key for the column in the "Model Key Path" field. Here in the figure above you can see that for the "Id" column, the "Model Key Path" field has "ClientId" entered.
To give the DADataTableController content to display, we need to assign the DADataTable that is retrieved when the "Load" button is pressed. Here dataIsReady: is called when the NOTIFICATION_DATA_READY is received and it assigns the the retrieved data table to the IBOutlet for the array controller.
//AppDelegate.m
- (void)dataIsReady:(id)notification {
    NSLog(@"DATA IS READY...");
    dispatch_async(dispatch_get_main_queue(), ^{
        self.tableController.table = self.dataTable;
    });
}
Adding a new row
To add a new row to the table is as easy as calling the add: method of the DADataTableController, it will then automatically be selected in the table view.
Here we make use of this and we retrieve the newly selected role and specify default values to some of the fields. Finally the newly added row in put into an edit state in the "Name" column.
//AppDelegate.m
- (IBAction)add:(id)sender {
    // add new row using DADataTableController
    [self.tableController add:sender];

    // obtain just added row and set some defaults there
    DADataTableRow *addedRow = [[self.tableController selectedObjects] firstObject];
    addedRow[@"ClientName"] = @"[new client]";
    addedRow[@"ClientEmail"] = @"temp";
    addedRow[@"ClientPassword"] = @"123";

    // move added row into edit state in NSTableView
    [self.tableView editColumn:1 row:[self.tableController selectionIndex] withEvent:nil select:YES];
}
Removing a row
To remove a row from the DADataTableController you use the remove: method passing in the table view. This will delete the selected rows.
Here, we retrieve the selected row and present a dialog using information from the row to confirm that the user really wants to delete the row. If they reply in the affirmative, then the table controllers remove: method in called.
//AppDelegate.m
- (IBAction)remove:(id)sender {
    // obtain selected row for removing attempt
    DADataTableRow *rowToRemove = [[self.tableController selectedObjects] firstObject];

    // get confirmation from the user
    NSString *customerText = [NSString stringWithFormat:@"%@ [id=%d]", rowToRemove[@"ClientName"], [rowToRemove[@"ClientId"] intValue]];
    NSAlert *alert = [NSAlert alertWithMessageText:@"Confirm Remove Action"
                                     defaultButton:@"Remove"
                                   alternateButton:@"Cancel"
                                       otherButton:nil
                         informativeTextWithFormat:@"Do you really want to remove client\n %@", customerText];

    [alert beginSheetModalForWindow:self.tableView.window completionHandler:^(NSModalResponse returnCode) {
        if (returnCode == NSAlertDefaultReturn) {
            // remove selected row using DADataTableController
            [self.tableController remove:self.tableView];
        }
    }];
}
Adjusting the toolbar
In this sample we make use of some of NSObjectController properties that DADataTableController inherits. The property canAdd returns true when it is possible to add a row, this is used to control the state of the "Add" button. To control the "Remove" button we use the canRemove property which will return true when a row is selected and false otherwise. Finally we use the hasChanges property of DADataTable to control whether the "Apply" button is enabled.
//AppDelegate.m
- (BOOL)validateToolbarItem:(NSToolbarItem *)theItem {
    NSInteger index = [self.serversPopup indexOfSelectedItem];
    BOOL hasServer = ((index >= 0) && (index < (self.serversPopup.itemArray.count - 2)));

    if ([[theItem itemIdentifier] isEqualToString:@"load"]) {
        return hasServer;
    }

    if ([[theItem itemIdentifier] isEqualToString:@"add"]) {
        return self.tableController.canAdd;
    }

    if ([[theItem itemIdentifier] isEqualToString:@"remove"]) {
        return self.tableController.canRemove;
    }

    if ([[theItem itemIdentifier] isEqualToString:@"apply"]) {
        return self.tableController.table.hasChanges;
    }

    return YES;
}