DAArrayDataSource
The DAArrayDataSource desktop sample demonstrates how to use the DAArrayDataSource helper class which makes it easy to take an NSArray of KVO-compliant objects, such as DADataTableRow, and display them in an NSTableView. The intention of the class is to provide a quick and easy way to get data displayed in a table before a more complex UI has been developed.
Getting Started
The Desktop sample is typically located in /Developer/RemObjects Software/Samples/Data Abstract/Desktop/DAArrayDataSource, though you may have installed the Data Abstract for Cocoa and it's samples in another location.
To build it, you will of course need Xcode, and like all the samples provided with Data Abstract for Cocoa you will need to be running the Relativity Server with the DASamples Domain and the Simple Schema available.
Running the Sample
This sample shows many of the features that the DAArrayDataSource class provides, specifically:
- Demonstrates two way sorting of data
- Editing fields, displaying fields that are changed.
- Conditional highlighting
- Changing Font and Row Heights
- Reporting information from selected rows.
- Protecting the contents of table rows from inline editing by making them "Read Only"
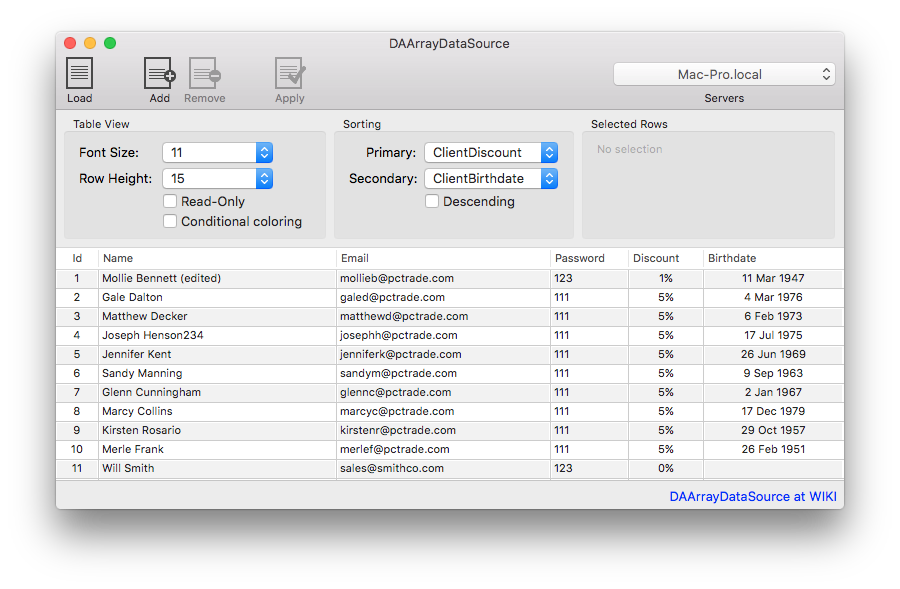
When this sample is run you will see an empty table, a toolbar which contains four buttons and a pop-up, and some additional controls for adjusting the table view and the sorting order of the table data.
On the toolbar, the "Load" button retrieves "Clients" table and displays the results in the table. The "Add" button adds a new row to the DADataTable. The "Remove" button will be enabled when a row is selected and will delete it from the local DADataTable. The "Apply" button sends a delta of the changes to the server and applies the changes there. Finally the "Servers" popup contains a list of available servers discovered by the Zeroconf discovery system. When the sample is run, it starts a Zeroconf discovery service that looks for instances of Relativity Server running on the local network. Any discovered servers will be added to the popup, if no servers are discovered then the dropbox on the toolbar will be empty. You can specify a server address yourself by clicking on the popup and then clicking on "Specify custom URL...".
The controls in the "Table View" section can be used to affect how the data is visually displayed in the table. Note that the changes made there only take affect after the table data has been retrieved :
- The Font Size pop-up allows you to pick the font size to be used in a table cell.
- The Row Height pop-up allows you to specify the row height of the cell. Note that class wise, unless you specify a
mainTextField, the specified row height is independent of the font size. IfmainTextFieldhas been specified then the the row height is adjusted to account for the font size of themainTextField - The Read-Only checkbox makes the table read only and prevents changing the contents of a row, however you can still add or delete rows.
- The Conditional coloring checkbox enables/disables coloring a row based on the value of a field. In this sample rows will be colored red when the discount is between 21% & 100%, blue when the discount is greater than 10% but less than 20% and otherwise the text is black.
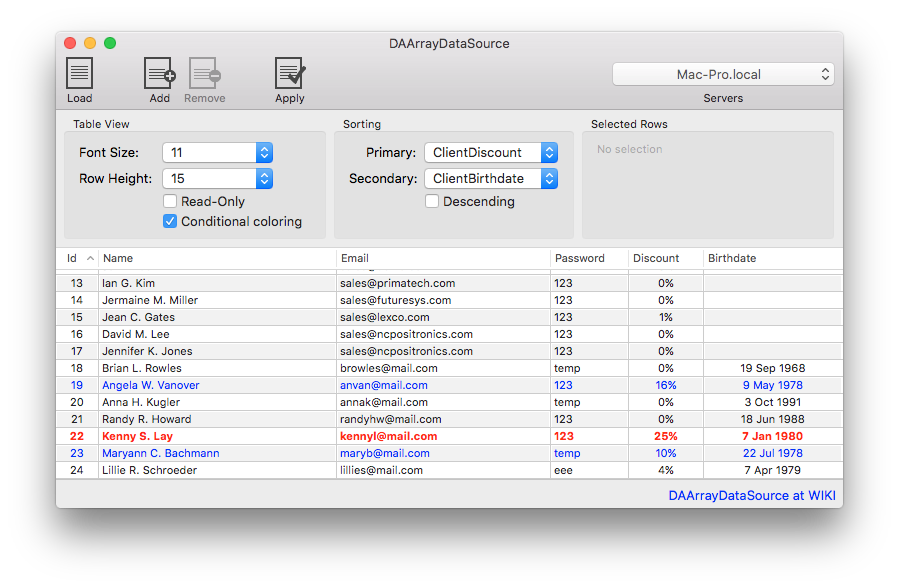
The "Sorting" section provides controls to change how the table data is sorted. You can specify both a primary and secondary key, as well as specifying the sorting direction with the "Descending" checkbox. Both the "Primary" and "Secondary" popups list 4 of the available 6 fields.
Finally the "Selected Rows" area displays the contents of the Name and Id fields for the currently selected row(s).
Examining the Code
The code for creating the connection to the server and handling logging in is covered by other samples, likewise other samples cover manipulating the DADataTable and applying changes back to the server. This information below is solely about using DAArrayDataSource and DAArrayDataSourceDelegate.
NOTE If the table name, or the field names do not exist then an ROException will be raised and should be handled appropriately.
App Structure
The sample is built around four classes; AppDelegate, DataAccess, ServiceAccess, and RegisterServiceWindowController.
The DataAccess class handles everything related to interacting with the Data Abstract SDK; including retrieving data from an instance of Relativity Server and applying changes back to the server.
The ServiceAccess class handles the discovery of any instances of Relativity Server that are available on the local network using ROZeroConf which is a feature available with the Remoting SDK that Data Abstract is built upon. ServiceAccess sets up a ROZeroConfBrowser Class object which searches for any servers that broadcast a value matching the value defined for RELATIVITY_SERVICE_NAME. When a service is found, or indeed disappears, the server list is updated and the popup with the list of available servers is also updated. It also handles the registration of custom server addresses. To explore further the ServiceAccess class and Zeroconf discovery see the article: The ServiceAccess Class and Zeroconf discovery.
The RegisterServiceWindowController class is a subclass of NSWindowController which handles the UI aspects of a user manually adding a server url.
Lastly the AppDelegate class handles the primary setup of the application, registers that it will listen for notifications broadcast by the ServiceAccess and DataAccess classes, and acts as a delegate to the DAArrayDataSource, RegisterServiceWindowController, DataAccess and NSTableView classes.
DAArrayDataSource
Setting up the DAArrayDataSource class is very easy. Simply declare a class as adopting the DAArrayDataSourceDelegate protocol, and then set that class as the delegate for the DAArrayDataSource. Finally assign a reference to the NSTableView you will be using to display the data to the tableView property.
In this sample the AppDelegate class implements the DAArrayDataSourceDelegate protocol, so having created an instance of DAArrayDataSource as arrayDataSource, we pass self to the arrayDataSource.delegate property. Then the IBOutlet reference to the tableView is assigned to arrayDataSource.tableView.
From this point on, many of the manipulations to the table & table view are made through the arrayDataSource object, rather than directly with the tableView object.
//AppDelegate.m: - (void)applicationDidFinishLaunching:(NSNotification *)aNotification
self.arrayDataSource = [[DAArrayDataSource alloc] init];
self.arrayDataSource.delegate = self;
self.arrayDataSource.tableView = self.tableView;
DAArrayDataSourceDelegate
The DAArrayDataSourceDelegate protocol provides various optional methods that will be called too apply some of the advanced features used in this sample like applying coloring to rows/columns and letting the delegate class know that the selected row(s) have changed.
The tableViewSortingDidChange: method is called whenever a row is selected in the underlying table. Here when the selection changes a new NSMutableString is created with the Name and Id values from the selected rows and it is passed to an NSTextField.
//AppDelegate.m
-(void)tableViewSelectionDidChange:(NSTableView *)aTableView {
    self.selectedPersonLabel.stringValue = [self selectedPersonsString];
}
To retrieve a list of the currently selected rows use the selectedRows property which will return the list in an NSArray. If no row is selected then that array will be empty. This method is used in this sample to prepare the selectedPersonsString retrieved above.
//AppDelegate.m
- (NSString * )selectedPersonsString {

    NSMutableString * selectedPerson = [NSMutableString stringWithString:@""];
    for (DADataTableRow * row in self.arrayDataSource.selectedRows) {
        [selectedPerson appendFormat:@"%@ (%@)\n",
         [row valueForKey:@"ClientName"],
         [row valueForKey:@"ClientId"]];
    }
    return selectedPerson;
}
The delegate method tableView:needsTextColor:backgroundColor:forTableColumn:row: when implemented provides the opportunity to provide row highlighting to particular fields or rows by changing the cell's text color, its background color or both.
In this sample, if the "Conditional coloring" checkbox is active the DADataTableRow for this particular rowIndex is retrieved and the value from the ClientDiscount field retrieved. That discount value is then tested and the foreground color (text) is set as appropriate.
//AppDelegate.m
- (void)tableView:(NSTableView *)tableView
   needsTextColor:(NSColor **)text
  backgroundColor:(NSColor **)back
   forTableColumn:(NSTableColumn *)TC
              row:(NSInteger)rowIndex {

    if (!self.coloringMode)
        return;

    DADataTableRow * row = [[self.arrayDataSource array] objectAtIndex:rowIndex];
    double discount = [[row valueForKey:@"ClientDiscount"] doubleValue];
    if ((discount >= 0.0) && (discount < 0.1))
        * text = [NSColor blackColor];

    if ((discount > 0.1) && (discount < 0.2))
        * text = [NSColor blueColor];

    if ((discount > 0.2) && (discount < 1))
        * text = [NSColor redColor];
}
Setting the Table data
The refreshUI method is called when the NOTIFICATION_DATA_READY is received. The notification is dispatched from DataAccess to inform the app that the data has been retrieved from the server and is available for use. Here we simply assign the NSArray of DADataTableRows to the DAArrayDataSource object arrayDataSource, which will then trigger the table view to reload and display the data.
- (void)refreshUI:(NSNotification *)notification {
    dispatch_async(dispatch_get_main_queue(), ^{
        [self.arrayDataSource setArray:self.table.rows];
    });
}
Changing Font Size
By default DAArrayDataSource uses the default table view setting for a row's font size, however you can easily override it by assigning a value to the fontSize. After that just reload the table view and the view will be updated.
//AppDelegate.m
-(IBAction)changeFontSize:(id)sender {

    NSString * val = self.fontSizePopup.titleOfSelectedItem;
    self.arrayDataSource.fontSize = [val floatValue];
    [self.tableView reloadData];
}
Changing a Table Row's Height
There are two ways to set a table row's height using DAArrayDataSource; the first is by simply assigning a value to the rowHeight property of DAArrayDataSource and then reloading the table view. Setting the row height this way will pay no attention to the size assigned to the table's font, so you will need to manually ensure that it looks the best.
An alternate option, not used in this sample, is to specify a column/field that will act as the main text field. After assigning the string name of the column you are interested in to mainTextField, the rowHeight returned will be adjusted to take into account the fontSize. The benefit is that the returned row height will always be big enough to display the row's text, even if you assign a lower value to rowHeight; note that you can however set a larger value to rowHeight and that will be used.
//AppDelegate.m
-(IBAction)changeRowHeight:(id)sender {

    NSString * val = self.rowHeightPopup.titleOfSelectedItem;
    self.arrayDataSource.rowHeight = [val floatValue];
    [self.tableView reloadData];
}
Setting Rows as Read Only
The DAArrayDataSource class provides a readonly property which can be used to prevent inline editing by double clicking on fields in the table view. The readonly property takes a boolean value, which is true to prevent edits, and false to allow edits.
//AppDelegate.m
-(IBAction)changeReadonlyStatus:(id)sender {
    NSInteger state = [((NSButton * )sender) state];
    self.arrayDataSource.readonly = (state == NSOnState);
}
Changing Sort Order
A benefit of the DAArrayDataSource class is that it makes it very easy sort the data in the table view using both a primary and optional secondary sort fields. To use them simply assign the name of the primary sort field to the sortField property and the name of the column to use as the secondary sort field to secondarySortField property. The table will then automatically reload the data displaying with the selected sort order.
If you want to control whether the data is being sorted in ascending or descending order, simply assign a boolean value to the sortAscending property. Where YES or true will sort in ascending order, and NO / false will sort in descending order.
//AppDelegate.m
-(IBAction)changeSorting:(id)sender {

    self.arrayDataSource.sortField = self.sortPrimaryFieldName.titleOfSelectedItem;
    self.arrayDataSource.secondarySortField = self.sortSecondaryFieldName.titleOfSelectedItem;

    BOOL isDescending = (self.sortDescending.state == NSOnState);
    self.arrayDataSource.sortAscending = !isDescending;
}