Simple sample (Android) (Eclipse)
The Simple sample demonstrates the basic Data Abstract functionality, including loading, changing and updating of data from and back to a Data Abstract server from an android application.
There are two such samples, the first created using Eclipse and Java and the other using Visual Studio and the Oxygene language.
Getting Started
To get started with this sample you need to have Eclipse, the Eclipse ADT plugin and the Android SDK installed. Regarding the SDK you need a minimum of one of the Android API builds, the build tools and a system image if you wish to test the sample out in the simulator.
When you load the project in Eclipse you will need to copy the com.remobjects.dataabstract.jar and com.remobjects.sdk.jar from where you installed Data Abstract for Java (typically "c:\Program Files (x86)\RemObjects Software\Data Abstract for Java\bin") into the "libs" folder of the project and if needed go into the project properties and add them on the "Java Build Path" tab.
Finally by default the sample interacts with the RemObjects sample server at "http://remobjects.com:8099/bin". If you would prefer to test with local data then you can build a custom Data Abstract server. Note that if you add a new row and re-download the data you likely won't see the new row as by default the sample only retrieves the first 20 rows. You can change this by entering the "Settings" section, going to "Advanced" and change the value for "Records to Load" to something higher than 20.
Running the Sample
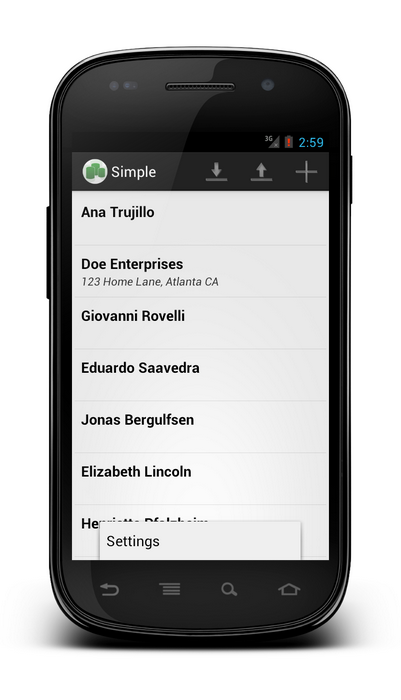
The sample interacts with a sample server to retrieve "Clients" from a "Clients" table and display that content in a table view. You can edit the existing data, add new rows, delete existing rows and apply those changes back to the server.
The UI is split in a menu bar with 3 or 4 buttons (depending on screen size). The down pointing arrow retrieves data from the server. The up pointing arrow applies the local changes to the server. The "+" button allows you to add a new row to the table. The "..." or "Settings" button opens a settings page where you can change what server the sample connects to and the number of rows to retrieve.

When the sample is initially run the list view is empty, the first step is to load the data by pressing the "Load" button (down pointing arrow) which will retrieve the first 20 records from the "Clients" table and populate the ListView with that data.
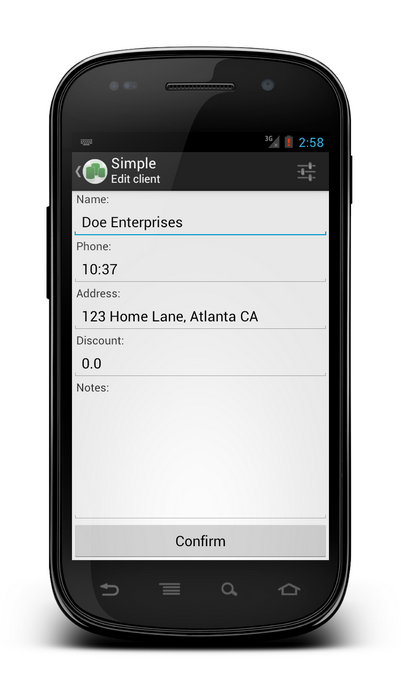
To modify the content of an existing record simply tap the row you want which will open a edit page which displays all the content of that record. When you are finished editing simply press the "Confirm" button to return to the list view. At this point any edits to the data are only made to the local data, you will need to apply the changes back to the server for anyone else to see them.

To delete a row from the list view simply do a long press on the item and press the delete button that appears.
To add a new entry click the "Add" button (the "+" icon), which will insert a new record to the table and open the edit view so you can set the fields as appropriate. At this point any changes you have made to the data will only be in the local data, to apply those changes to the schema press the "Upload" menu item.
Examining the Code
The Java based sample is comprised of 5 classes that handle the UI and those functions needed to interact with Relativity Server.
- DataModule handles initializing the basic connection to the server and creating the RemoteDataAdapter. It also registers itself to listen for changes to the preferences so that when the settings data is changed the RemoteDataAdapter is updated to reflect the new data.
- MainActivity handles the main UI for the sample and dictates what data from a table row is displayed in the
ListView. ThefillDataandupdateDatamethods discussed below come from this class. - TableListAdapter is a class used by MainActivity to display the "Clients" data in the
ListView. The class implements the TableChangedListener. - ClientEditActivity handles the UI aspects of editing a "Client" from the "Clients" table, it also handles editing a newly added row.
- SettingsActivity handles interacting with the "Preferences" subsystem for storing and retrieving data that will be used for logging in like the server url, username and password.
Retrieving Data
The fillData method of MainActivity is responsible for retrieving the Clients table from the server using an asynchronous approach. The sample technically supports using both asynchronous and synchronous methods to retrieve the data, however latest versions of Android prevent network operations from running on the main thread by raising an android.os.NetworkOnMainThreadException.
The first step to retrieving the data is to create a TableRequestInfo which provides a means to control what data is retrieved (all records, limited subset of records) and how its done. If you wanted to use Dynamic Where, Dynamic Select or DA SQL you would create those queries and add them to TableRequestInfo or one of its subclasses. Here the number of records to retrieve is passed to the setMaxRecords, and true is passed to setIncludeSchema to indicate that information about the table schema should be returned.
Sending the request for data is done with the fillAsync method of RemoteDataAdapter. It takes a DataTable to be retrieved as the first argument, the second argument is an instance of TableRequestInfo or ones of its subclass and finally a FillRequestTask Callback instance.
Here the the ClientsTable from the DataModule class is passed as the first argument, the previously created TableRequestInfo object is the second argument and for the last argument we make use of the factory method CallBack of FillRequestTask which returns an anonymous instance of FillRequestTask.Callback which has a single method completed. The completed method is overridden to create a Runnable that will be run on the main UI thread to update the UI with the new data or to report a failure message.
The synchronous version is shorter and simpler, however as it is run on the main UI thread and will not return till the data has been retrieved it would block the UI from updating. It is not a recommended approach to take in general and Android itself now prevents you from doing network requests on the UI thread. The fill method takes two arguments, the first is the DataTable to be retrieved and the second is the TableRequestInfo object that was created earlier. The retrieved data is copied into the supplied DataTable object.
//MainActivity.java
private void fillData() {

    // you can change the request if you want some specific records to load
    TableRequestInfo tri = new TableRequestInfo();
    tri.setMaxRecords(fDataModule.MaxRecordsToLoad);
    tri.setIncludeSchema(true);

    if (USE_ASYNC) {
        fDataModule.DataAdapter.fillAsync(fDataModule.ClientsTable, tri, new FillRequestTask.Callback() {
            public void completed(final FillRequestTask aTask, Object aState) {

                runOnUiThread(new Runnable() {
                    @Override
                    public void run() {
                        if (aTask.isFailed() || aTask.isCancelled()) {

                            Toast.makeText(MainActivity.this, aTask.getFailureCause().getMessage(), Toast.LENGTH_LONG).show();

                        } else {
                            fAdapter.notifyDataSetChanged();
                            Toast.makeText(MainActivity.this, "Remote data retrieved", Toast.LENGTH_LONG).show();
                        }
                    }
                });

            }
        }).execute();
    } else {
        fDataModule.DataAdapter.fill(fDataModule.ClientsTable, tri);

        // uncomment next line if DataTableListAdapter is not signed to
        // TableChanged event
        //fAdapter.notifyDataSetChanged();
        Toast.makeText(this, "Remote data retrieved", Toast.LENGTH_LONG).show();
    }

}